


Showing top 0 results 0 results found
Showing top 0 results 0 results found
Setting up a Facebook page for your business is a good way to start building your online presence and brand recognition. It allows you to show your business to a huge audience. Unless you want to use ads, and you probably don’t have to, but more on that later, you won’t need anything but a bit of your time to get started and set it up.
Here’s a step-by-step guide on how to create your own Facebook business page.
1. Reserve a name
If you don’t have a page set up yet, you should do it ASAP. With thousands of Facebook fan pages cropping up each day, there’s always the risk that somebody can take the name you wanted to use. Unless you plan on using a very specific name, it won’t hurt if you go to Facebook right now and create a page.
To do that, go to your Facebook page and click on the “See More” button in the left menu.
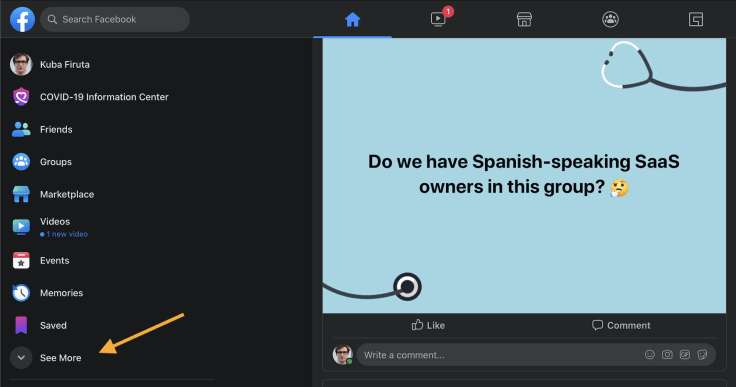
Right after that, scroll down to find the “Pages” section and click it.
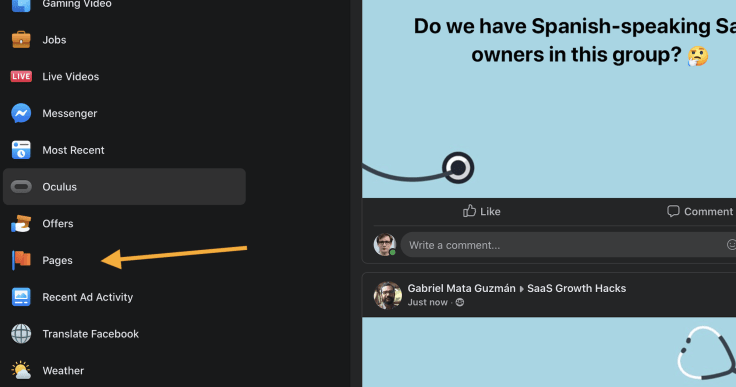
Finally, you want to click on the “Create New Page” button to start creating your Facebook business page.
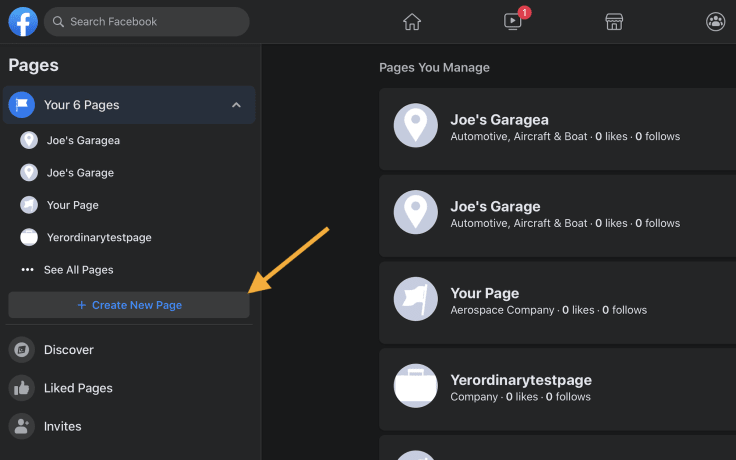
Here, you’ll be asked to provide a name for the page. A green checkmark will appear if the name is free and can be used.
2. Pick the right category
When setting up a Facebook page for your business, you’ll next be asked to provide a category for your page. This will affect the way people will reach your site, so you want to make sure its A-OK and that your page is in the correct category.
Just start to type in words that best describe your business, and see what comes up. You’re free to select a few categories if more than one fit.
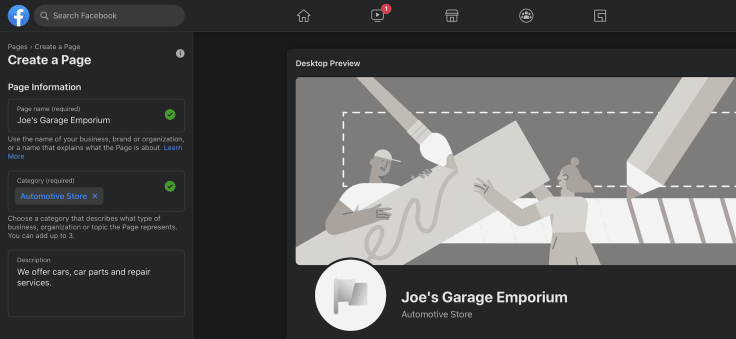
Next, provide a little bit of information about what your business does. This will appear in the description your customers will see on your Facebook business page. You can check out the preview to get an idea of how it will look.
When you’re done, hit the “Create Page” button to save your Facebook business page. From this point on, your page is created, and you don’t have to worry about someone taking your preferred name.
3. Unpublish your Facebook business page
Once you get the basics done, your page will go live. However, there’s still little to see there. Instead of showing an empty page, you can hide it for the time being and make all the necessary changes without worrying that somebody will see an unfinished page.
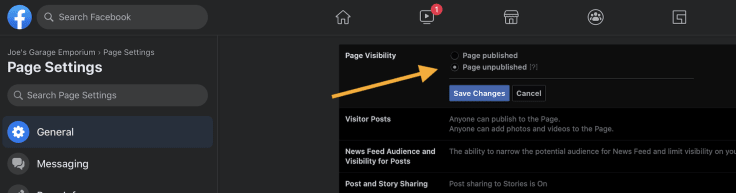
To unpublish a Facebook business page, you need to go to “Page Settings” and edit the “Page Visibility” settings. Tick the “Page Unpublished” box and click on “Save Changes.”
Once that’s done, your page will be visible only to you. You can now set everything up and even add a few posts to the page. That way, it won’t look completely empty. You add a couple of posts a few days apart to make it look more natural.
4. Add basic information about your business
Next up, you should provide some basic information for your Facebook business page. These will help Facebook users find your page.
To get started, click on the “Edit Page Info” button in the “Settings.” Apart from categories, you’ll need to provide a short description of your business. You’ll also be asked to provide your company’s website address along with other ways your customers can get in touch with you.
You can then choose your unique Facebook username. It’s an additional way people will be able to find you, and it also provides you with a unique URL address. This needs to be done ASAP. Once taken, nobody else will be able to use it, so make sure you get yours quickly.
You can add the page to your favorites in order to quickly access it from the Facebook menu. It’s optional, but it’s handy to do it.
Next, you should also select the preferred group of users you want to reach. You’ll be able to select the target age range for your business as well as list a few interests that will help people can find your page.
5. Add a longer description
Apart from the short description, which is limited to 255 characters, you can also add a longer one in the page information settings. The long description allows you to tell a bit more about your business. The biggest perk that comes with it is the ability to list links to all your other social media profiles and websites.
To set up a longer description, go to the “About” section of your page and click on “Page Info.” Once there, find the “Long Description” section and click on the text area to start writing. Make sure to include links to your other SM profiles and all the websites you want your fans to see.
6. Add graphics or pictures
Your profile and cover pictures will be the first things people see when accessing your profile. These pictures will also be how people recognize you when seeing your posts in their feed. This makes them quite important, so make sure you get them right!
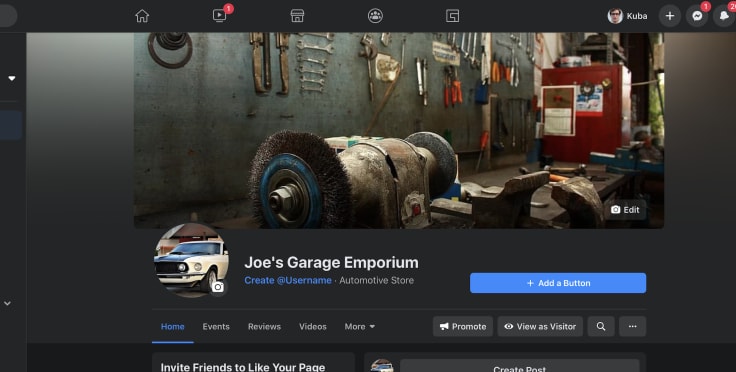
The profile picture file should be 180px by 180px. The cover photo file should be 828 px by 315px, with the mobile area in the middle at 560 px by 315 px size.
There’s a lot you can do to make your profile picture and cover photo combo interesting. For example, you can make it look as if the profile pic was a part of the cover.
7. Set up your working hours
To let people know when they can get a hold of you online or visit your shop, you can set up your working hours. They’ll show up on your Facebook business page and change color depending on if it's within (green) or past (red) your working hours. You can do that in the “Hours” section in the “Page Info” settings. You’ll be able to select specific hours or just state that you’re open 24/7.
8. Create a call-to-action
You can direct people on your Facebook business page to perform specific actions by setting up a call-to-action. For example, you can create an “Order Food” button that will lead them directly to your product listing.
To do that, click on the “Add” button. There’s a wide range of buttons you can pick, e.g., “book now,” “contact us,” etc. Choose the one you want to use, and add a website address for it. This can be a link to your contact form or your product catalog. Select “Save” to finish.
Setting up a call-to-action like this is one of the easiest ways you can get somebody from your Facebook business page to look at your products or services. So, you should definitely get right on it.
9. Share some posts before going public
Before you make your Facebook business page public, you should go ahead and create a few posts. This can be anything, such as photos of your products, information on ongoing deals, etc. The goal here is to have your page look like an established business and not a fledgling company that is just starting out.
You can space them out a bit over a few days so they look more natural. For example, you can add one post on Monday and one on Tuesday before publishing the page on Wednesday.
You can publish your page the same way you unpublished it before. Go to “Settings,” edit the visibility options, and untick the box.
10. Get some fans
Once your page goes live, you still need to get some fans to make it look like a genuine business. You’ve probably seen offers where you can get hundreds or thousands of followers for a couple of bucks. However, this will only hurt your page. That’s because Facebook will try to suggest your page to users who are similar to your existing fanbase. However, the fans you can buy are usually fake accounts from all over the world.
Buying likes will not only hurt your wallet but also your business in the long run. Instead of showing up in the feeds of normal users and potential customers, your posts and updates will reach only bots and fake accounts.
What you can do instead is use the suggested page feature on Facebook, and ask your friends and family to like your page. This way, you’ll be able to start growing an organic fan base. You’ll start showing up in several feeds of people who might be interested in your products or services.
Don’t forget to advertise your page to your customers and followers on other social media channels. There’s a good chance that satisfied customers or people who already follow you on one channel will want to follow you on Facebook as well. You should also add a Facebook icon that leads to your profile in your website footer. You can do the same for your email footer and your newsletters.
Next steps
Once you get a basic business page going, it’s all about consistent updates. Start posting things your potential fans want to see, and you’ll slowly grow your following.
There’s also the possibility of using paid ads to spread the word about your Facebook business fan page. It’s not necessary, but you can give it a try if you have a marketing budget to work with. It’s like buying additional reach. It’ll probably help you in the short run, but the more fans you have, the less you’ll get in return.
If you are using LiveChat, you can also use our LiveChat Facebook Messenger integration to chat with fans from the LiveChat app.
Already have a page set up? Feel free to share how publishing the page went and what other things you’ve set up.

Get a glimpse into the future of business communication with digital natives.
Get the FREE report


Comments