Chats section is where the communication between agents and customers happens. Here you can provide round the clock support and boost sales by converting people who are casually browsing your website into customers.
LiveChat provides quite a few tools that help with handling chats effectively. Below, you can find a rundown of the most important features and options available in the Chats section.
Chat list
The chat list is divided into three sections: my chats (all of your ongoing conversations), queued chats (customers who are waiting to start a chat) and supervised chats (conversations you are currently supervising).
My chats
A list of your ongoing chats. You can switch between them by clicking on the names of customers. We will let you know that you received a new message through in-browser notifications.
There are two types of chat statuses:
active - either you or the customer has written something recently, these chats stay at the top of your list as they require your attention the most. If you don’t respond in 40 seconds a red rim will appear around the circle to remind you that you should respond immediately
inactive - the customer hasn’t responded for a certain time (you can set the time after a chat turns inactive in Settings); it doesn’t necessarily mean that a customer has left, they might just need more time to respond; all inactive chats are greyed out and are placed at the bottom of the list
Note that inactive chats don’t count into the concurrent chats limit; so if a chat becomes active again you might end up with more chats than your set limit.
Note that inactive chats don’t count into the concurrent chats limit; so if a chat becomes active again you might end up with more chats than your set limit.
Queued chats
Visitors who are waiting for an available agent. If you have some free time on your hands just pick a customer from the list to start a conversation.
Supervised chats
Chats that are currently handled by other agents in your account, you can pick which chats you want to supervise in the Traffic section. To help your teammates without going over to their desk, you can send them a message in chat that is invisible to the customer.
Unassigned Chats
Unassigned chats are chat messages submitted while your team is offline. There are several integrations that allow customers to reach you during offline hours:
Another source of unassigned chats is when the chat widget availability is set to always. It’s an asynchronous form of communication that doesn’t require both parties to be online in a chat to send messages to each other (like Facebook Messenger).
Messages submitted using this mode show up as unassigned chats in the LiveChat Agent app Chats section:
As you can see, LiveChat makes offline communication really seamless!
To handle several chats at the same time efficiently, you need to keep switching between them. Your visitors don’t know that you are chatting with more than one person and could get impatient if you don’t respond for a long time. You can also switch between chats using keyboard shortcuts.
To handle several chats at the same time efficiently, you need to keep switching between them. Your visitors don’t know that you are chatting with more than one person and could get impatient if you don’t respond for a long time. You can also switch between chats using keyboard shortcuts.
Chat list improvements
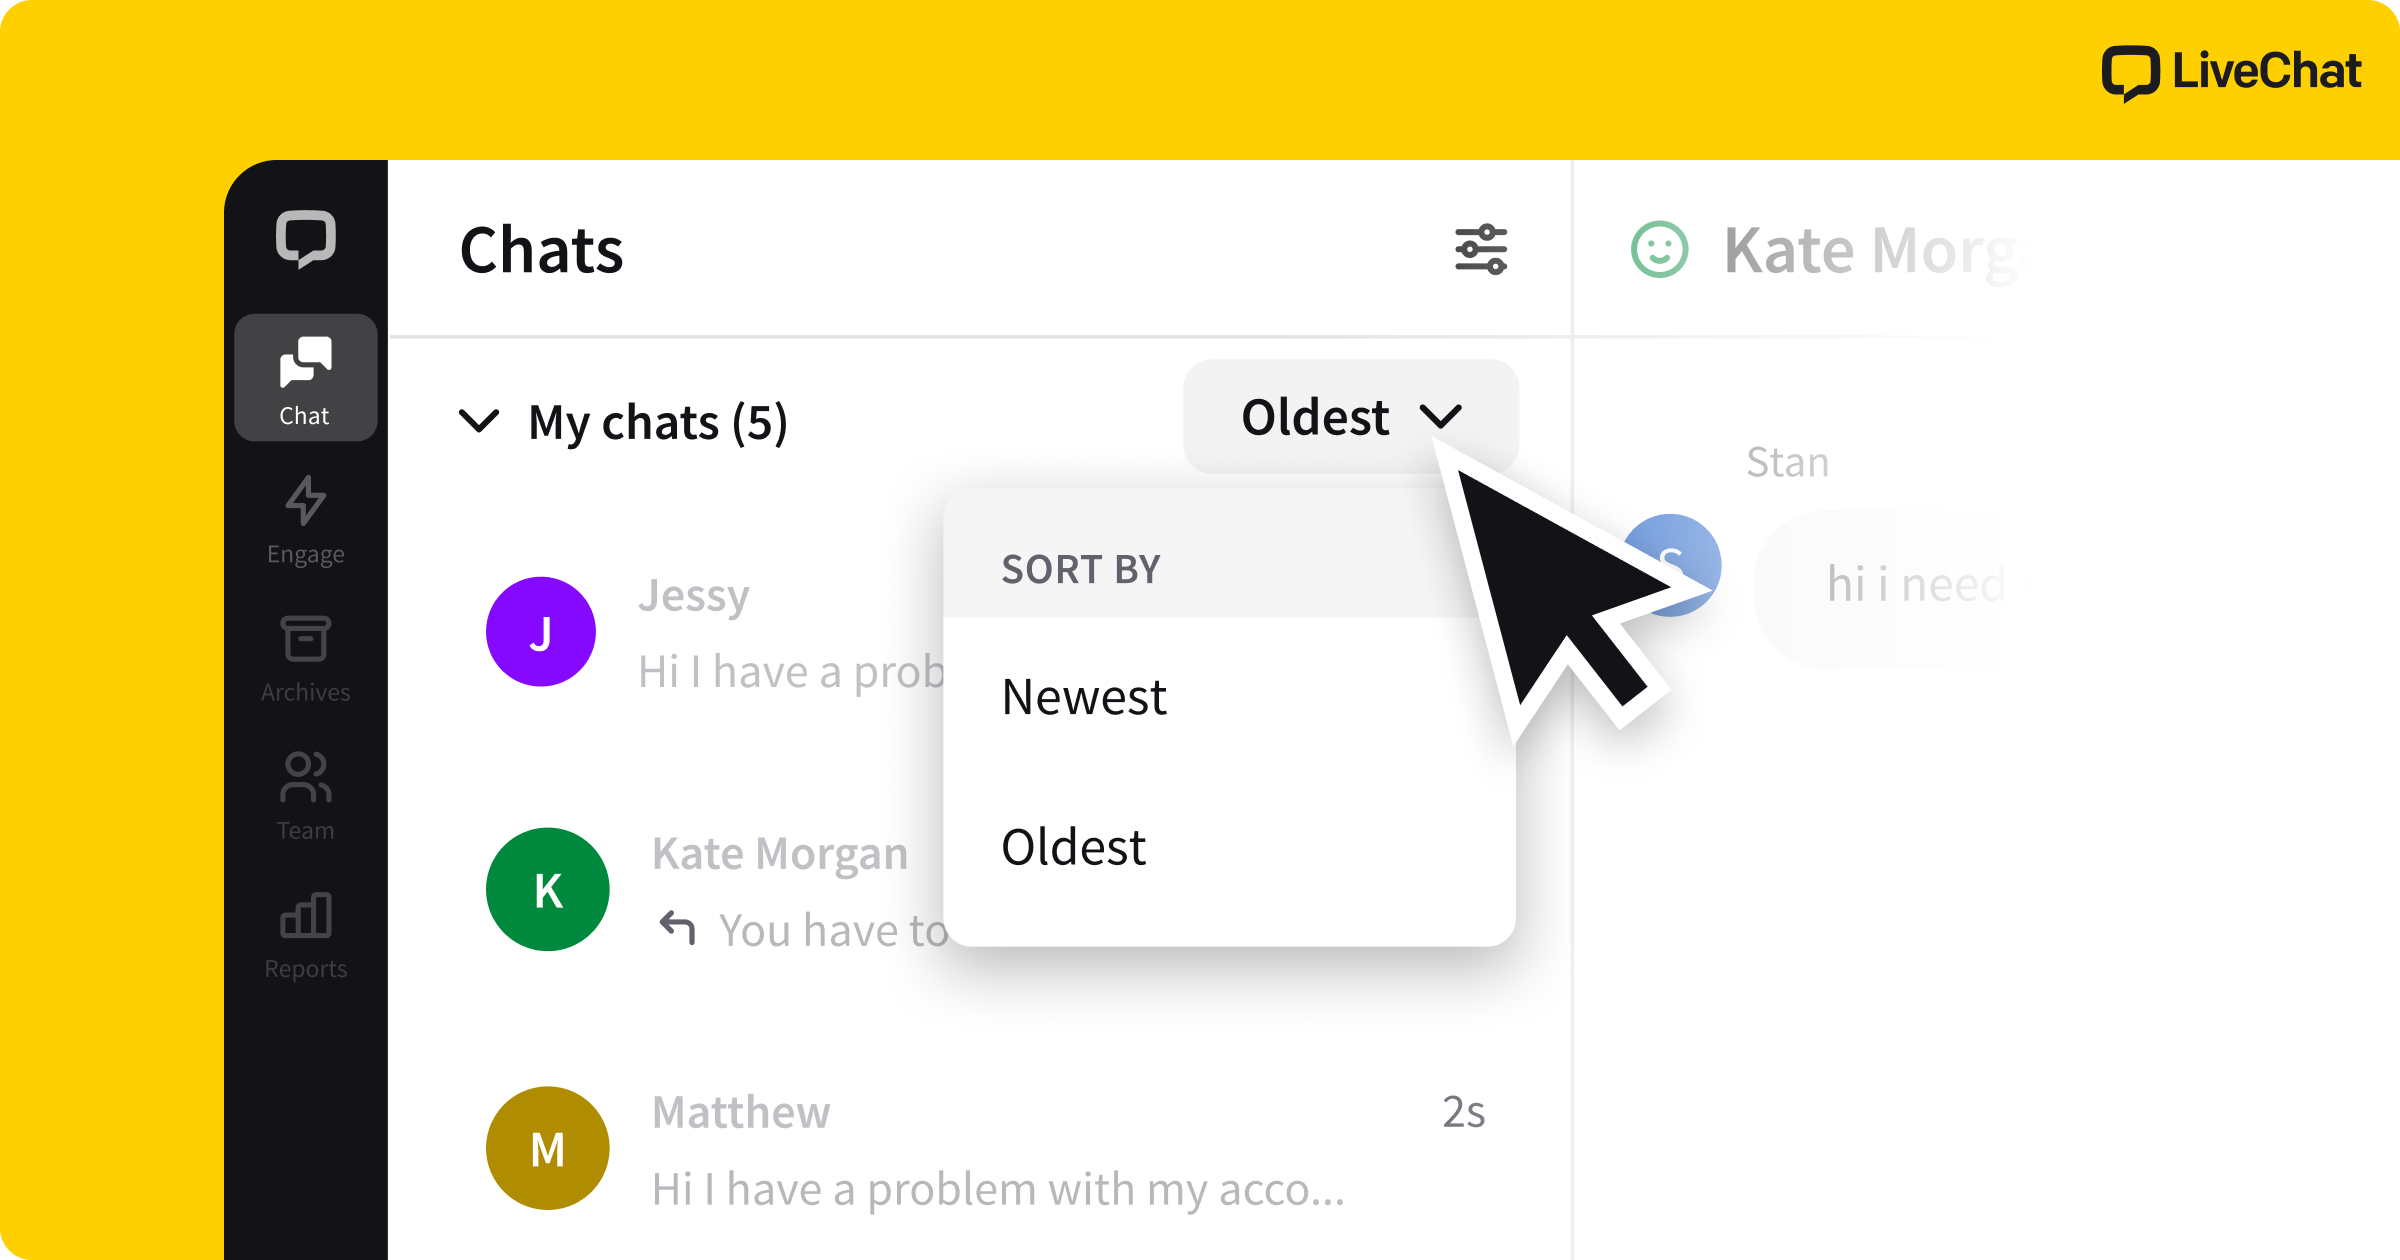
Sorting options
You can conveniently sort your queued and active chats by newest or oldest entries. These sorting options work on your chat list, and in the archives.
Sorting affect active chats only. Inactive chats are displayed under the sorted list, to avoid the confusion.
Sorting affect active chats only. Inactive chats are displayed under the sorted list, to avoid the confusion.
You can find the sorting options at the top of your chats list:
Reworked chat list timer
The new timer refreshes with each message sent from agents or clients, providing real-time insights into response times. This improvement aids you in monitoring how long clients are waiting for your attention and makes chats prioritization a breeze.
Agent response mark
The mark represents answered chats (the last response in a chat sent by an agent). This feature removes the hassle of entering every conversation one by one to determine who made the last comment. Now you can easily pick unattended clients without leaving your chats list. Navigate your conversations with newfound clarity thanks to this distinctive UI mark.
Private messages don’t display the agent response mark on the chats list.
Private messages don’t display the agent response mark on the chats list.
Chat feed
This is where the actual conversation takes place, aka the heart and soul of our app.
Chat history
In the history of your chat, you can see both the messages that were sent during the current conversation and messages that were sent before (providing the person you are talking to hasn’t cleared cookies since your last conversation).
Text area
To send a message, just type in your answer and press enter. We give your visitors a heads up that you are typing something so they know they need to wait for your reply. Once you press enter, your message will be sent to the visitor. And you will see it in the chat history.
Tip: Make sure you keep your messages short and informative and give your customers some time to read your message before sending the next one.
Tip: Make sure you keep your messages short and informative and give your customers some time to read your message before sending the next one.
Message sneak-peek
Message sneak-peek, lets you see what the visitor is typing before they send it over. This allows you to start thinking of the answer faster, making your responses quicker.
Canned responses
Canned responses are predefined messages that can store a large portion of text to be later recalled with shortcuts. To use canned responses in chats or tickets, simply type in # followed by the shortcut for the response you wish to use.
Learn how to create canned responses and more about their benefits in the canned responses tutorial.
Emojis
It is always a good idea to mirror the language of your customer. If they use formal language, make sure to be formal as well, but if they are informal and use emoticons, by all means, add emojis to your messages too. Click on the emoji icon to choose from over 1000 emojis in 8 categories.
Emoji reactions
You and your customers can react to each other messages with emojis. Each time you react, you pick a picture from a list.
It’s a simple, fast, and convenient way to let each other know how you feel. For example, you can use the hourglass emoji to let a customer know that you’re looking into their query. Or leave them a heart emoji as a reaction to their positive feedback, it will encourage them to write more in the future.
Give emoji reactions a go. You’ll be surprised how much impact a small picture can make!
Emoji reaction does not affect inactivity timeouts or other chat reports in any way. Feel free to react as much as you want!
Emoji reaction does not affect inactivity timeouts or other chat reports in any way. Feel free to react as much as you want!
To send an emoji reaction as an agent:
1
Hover your mouse over the message you want to react to.
2
Select the smiley icon, and then select the emoji you want to send.
To send an emoji reaction as a visitor:
1
Hover your mouse over the message you want to react to.
2
Select the smiley icon, and then select the emoji you want to send.
To change or unsend your reaction:
Click on the reaction you want to edit. Select another emoji to change the reaction, or select the current one to unsend it.
Clear, easy to use, and fun. Just another great way to share positive feelings over a chat!
On mobile apps, agents can view emoji reactions sent by visitors, but they can’t react themselves.
On mobile apps, agents can view emoji reactions sent by visitors, but they can’t react themselves.
Tags
Use tags to categorize chats and easily find all conversations that deal with the same issue later on. Tags can be added and edited in Settings.
How to send a file
Click on the paperclip icon in the bottom left corner.
Choose a file you want to send and click Open.
You can also copy to clipboard and paste the file into chat. You can use the key combinations (Control+C, Control+V for Windows and Command ⌘+C, Command ⌘+V for Mac) or right-click the file and pick the command from the menu.Alternatively, drag and drop files into the chat. Click and hold the selected file and drag it over the chat area.
You can also copy to clipboard and paste the file into chat. You can use the key combinations (Control+C, Control+V for Windows and Command ⌘+C, Command ⌘+V for Mac) or right-click the file and pick the command from the menu.Alternatively, drag and drop files into the chat. Click and hold the selected file and drag it over the chat area.
To finalize click Send.
Share reviews
You can easily share your customers’ reviews on popular social media platforms like X, Facebook or LinkedIn, promoting your customer service excellent skills. The review is displayed on a stylish background along with a Verified by LiveChat badge, setting it apart on feeds and walls.
You can share reviews directly from a chat by selecting the share icon and then selecting the platform where you want it to show:
Your reviews are also stored in a dedicated Reviews section as a part of the LiveChat reports. Visit it to find a full list of positive reviews and the option to share them as well.
Transfer
Chat transfers allow you to transfer a chat to another agent or group. Always make sure that the agent receiving the transfer is aware of the incoming chat.
How to transfer a chat
Select the three dots icon … in the top right corner.
Select Transfer to….
Choose either an agent or a group (you need to switch to Group tab to choose a group). To finalize click on Choose.
How to send a note
Notes let you send private messages (visible to agents only) while transferring chats. Notes are available in the Business and Enterprise subscription plans.
Select the +Add private note button at the bottom of the Transfer panel.
Write a message in a text area. Select the Transfer button to send the message along with the transferred chat as a note.
That’s it. The chat will be transferred immediately and you can focus on helping other customers.
Sometimes one conversation isn’t enough to solve a customer’s problem. This is where tickets come in handy. You can create them right from a chat - that way the transcript from the conversation will be included.
How to create a ticket from a chat
Click on the three dots “…” icon in the top right corner.
Click on Create ticket…
Provide the e-mail address of your customer, and a title of the ticket
Click on Create ticket.
That’s it! You can head to the Tickets section to assign a person responsible, add new information, edit it’s status etc.
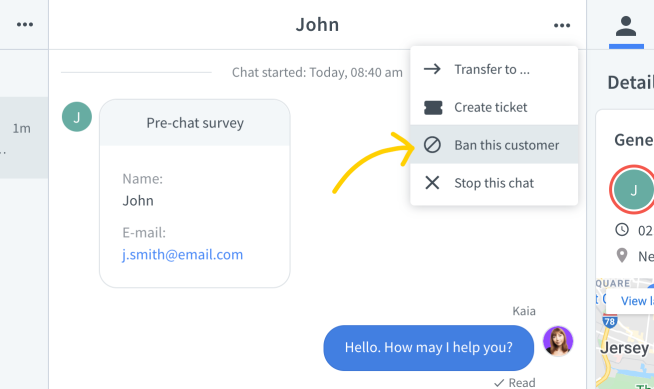
Ban Customers
Unfortunately, sometimes you need to ban a customer who sends spam or uses abusive language. We’re big fans of conflict resolution but the safety and comfort of your agents is key.
How to ban a customer
1
Select the three dots icon “…” in the top right corner.
2
Click on Ban this customer.
3
Select the number of days the visitor should be banned for.
4
To finalize, select Ban customer.
That’s it. You can see the list of all the banned customers in Settings. If you made a mistake, you can always unban a customer.
End chat
Once you respond to all the questions or solve all your visitor’s problems, you can close the chat. There are actually two ways to close a chat: from the chat list and from the chat feed.
How to end a chat (chat list)
Hover over the name of the customer in the chat list. An x should appear in the top right corner
Click on the x.
To finalize, click on Close and archive.
How to end a chat (chat feed)
Click on the three dots icon “…” in the top right corner.
Choose Stop this chat.
Confirm, by clicking on Stop chat.
Customer details
Here you can find a lot of useful information about the customer you are talking to. Use it to provide more personalized support.
What you can find in Customer details:
Contact info - name, e-mail address, time zone, location;
Pre-chat survey - information provided in the pre-chat survey;
Visited pages - number of visited pages and time spent on all pages together;
Additional info - number of previous visits and chats;
Technology - user’s device information.
Integrations
LiveChat can be integrated with a number of helpful third-party apps. They range from CMS platforms to desktop sharing apps. You can find and install them in Marketplace. Integrations can be used right in the Chats section - once installed, you will find them at the top of the Customer details tab.
RELATED ARTICLES
Using transfers and supervision
Learn more about using transfers and supervision during the chat. Those tools can be used to train new agents as well as for self-help between agents team.