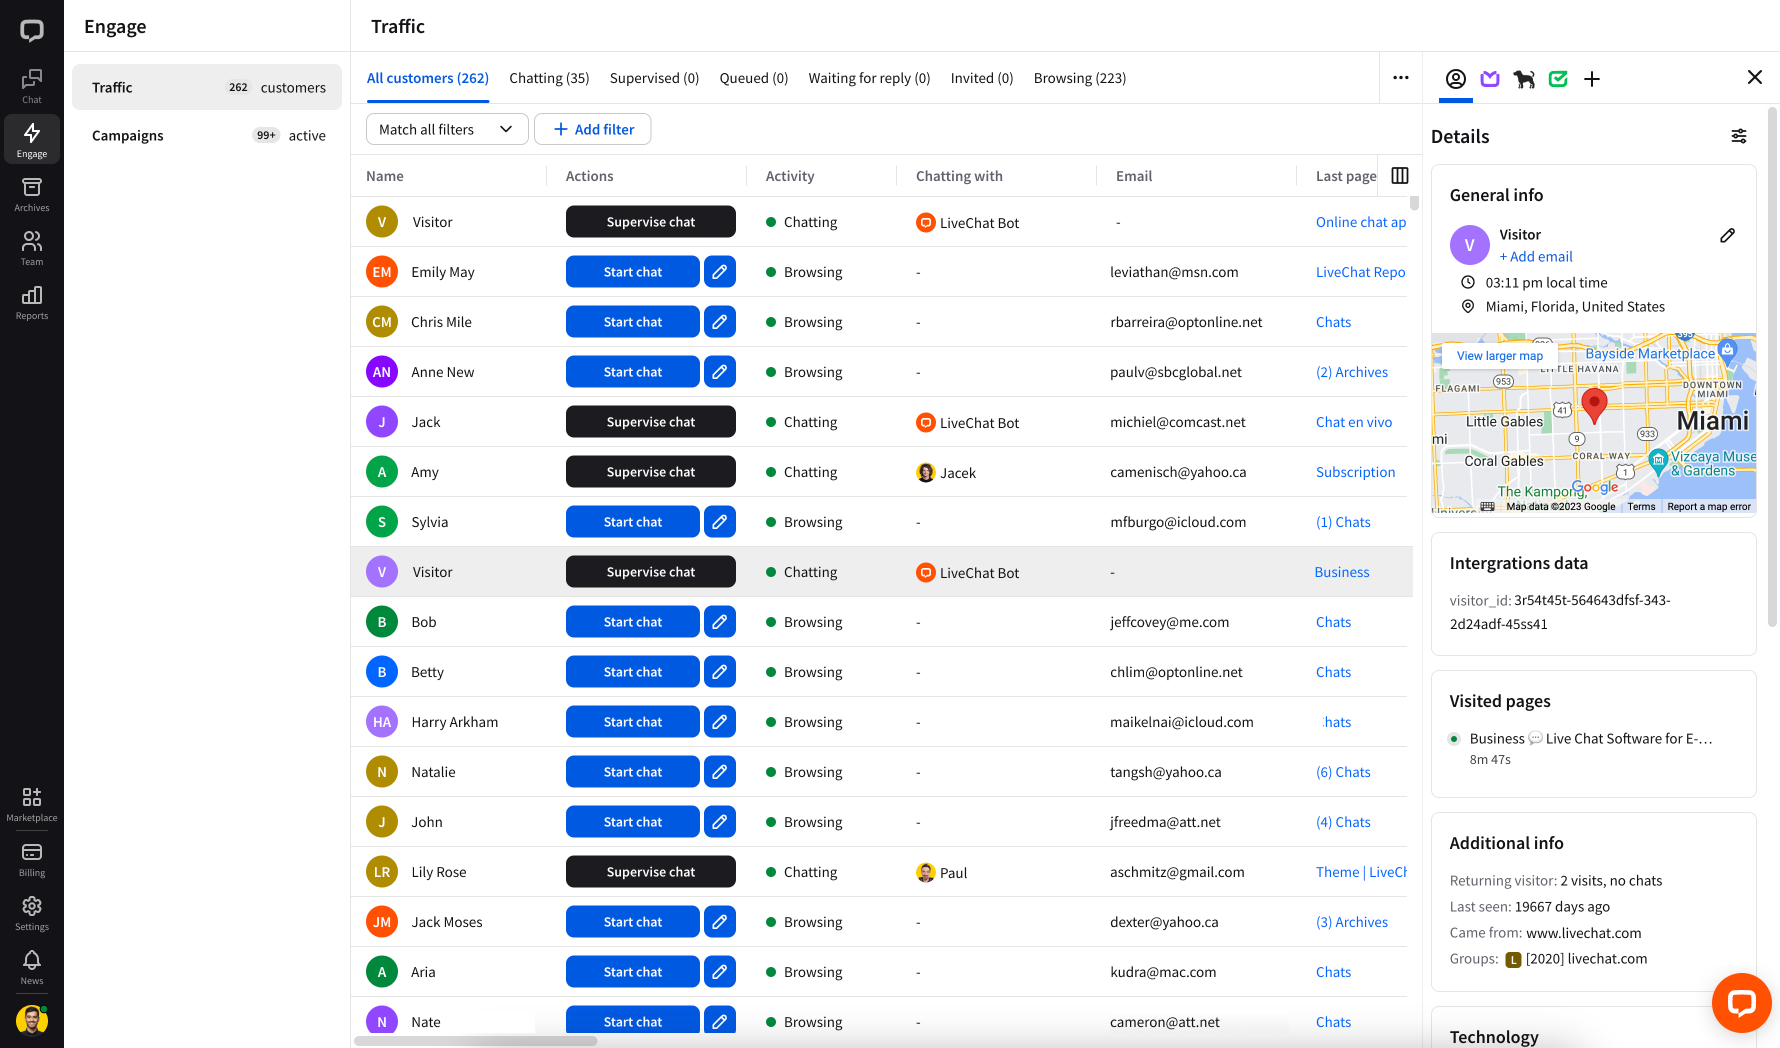
Traffic section shows the list of current visitors on your website in real-time. It gathers all sorts of useful data about them, e.g., name, e-mail address, location, time spent on your website, and many more. You can use it to spot prospective customers or simply make their customer experience better.
For Owners and Admins, Traffic is nested within the Engage section,
for Agents, Traffic is the whole Engage section.
Getting the most out of the Traffic section
You can treat the Traffic section as a virtual representation of your page. If you own an online shop, this section represents your shop. Visitors on different pages are like customers in different shop isles. The Traffic section helps you get in touch with these visitors and offer relevant advice on their purchases. You can use various data provided in this section to personalize your messages and win your customers’ hearts.
For example, you can look at the Last page and Time on all pages values to spot customers who are stalling for some reason: if it is a help page - maybe there are topics that aren’t covered. Or if its a product page, maybe they need more information or could be persuaded by a small discount? See other examples of values worth looking at:
Location: use this information to identify local/state users and offer them discounts on shipping.
Email: customer’s email (if they provided it), easily accessible on the list. Helpful when you need to look up a customer in your email communication.
Assigned group: which agent group is chatting with the customer. Useful to quickly see which group is currently the busiest.
No. of visits: customers who are more interested in your product/already made a purchase are more likely to get engaged in a conversation.
Number of chats: shows how many chats the customer had with you previously. A good indicator that you need to check previous chat history with a customer.
Device information: see how your customers browse your website. A good indicator of how important mobile is for your business.
Types of information that you can find in the Traffic section
Below you can find what types of information you can find in the Traffic section:
Name: you can see one of these: an IP address for customers who haven’t started a chat yet, a pre-set customer name if you don’t require it in the pre-chat survey, or a name that the customer provided in the pre-chat survey.
E-mail: an e-mail provided by the customer in the pre-chat survey.
Activity: one of the following: Chatting, Supervised, Queued, Invited, Browsing, Left website.
Chatting with: the agent that is currently chatting with the customer.
IP: the customer’s IP address.
Country, State, City: the customer’s location, based on their IP address.
Came from: the URL address of the referrer page.
Last page: the title of the page where the customer started the chat.
Device: the type of device the customer is currently using.
Operating System: the operating system of the device the customer is currently using.
Browser: the browser the customer is currently using.
Last seen: the date of the customer’s last visit.
No. of Visits: how many times the customer visited your website.
Number of chats: how many chats the customer had with your team.
Time on all pages: the time the customer spent on your website (all pages) during a session.
Sent greetings: the number of greetings the customer has received.
Accepted greetings: the number of greetings that the customer responded to.
Ignored greetings: the number of greetings the customer did not respond to.
Last greeting: the greeting that was sent to the customer last - you can edit greetings and their names in Settings.
Group: which group the chat was assigned to.
Customer id: a unique number identifying the customer. It can be used to look up the customer’s archived chats and tickets, for example.
Further parts of this tutorial show how to configure the traffic section to your needs. Watch our webinar to gain a better understanding of the settings.
Further parts of this tutorial show how to configure the traffic section to your needs. Watch our webinar to gain a better understanding of the settings.
Customize the Traffic section view
Customizing what data should be displayed in the Traffic section is quite easy. You can add/remove data columns depending on your needs, and rearrange the order however it suits you.
Please note that these settings are editable per user, not per license, so when you edit columns - the change only affects your instance of the LiveChat app.
Please note that these settings are editable per user, not per license, so when you edit columns - the change only affects your instance of the LiveChat app.
How to add/remove columns
1
Click on the ellipsis in the top right corner of the table.
2
Check the columns you want to add, and/or uncheck the ones you want to remove.
How to reorder data columns
1
Click on the ellipsis in the top right corner of the table.
2
Drag and drop the data columns you want to reorder.
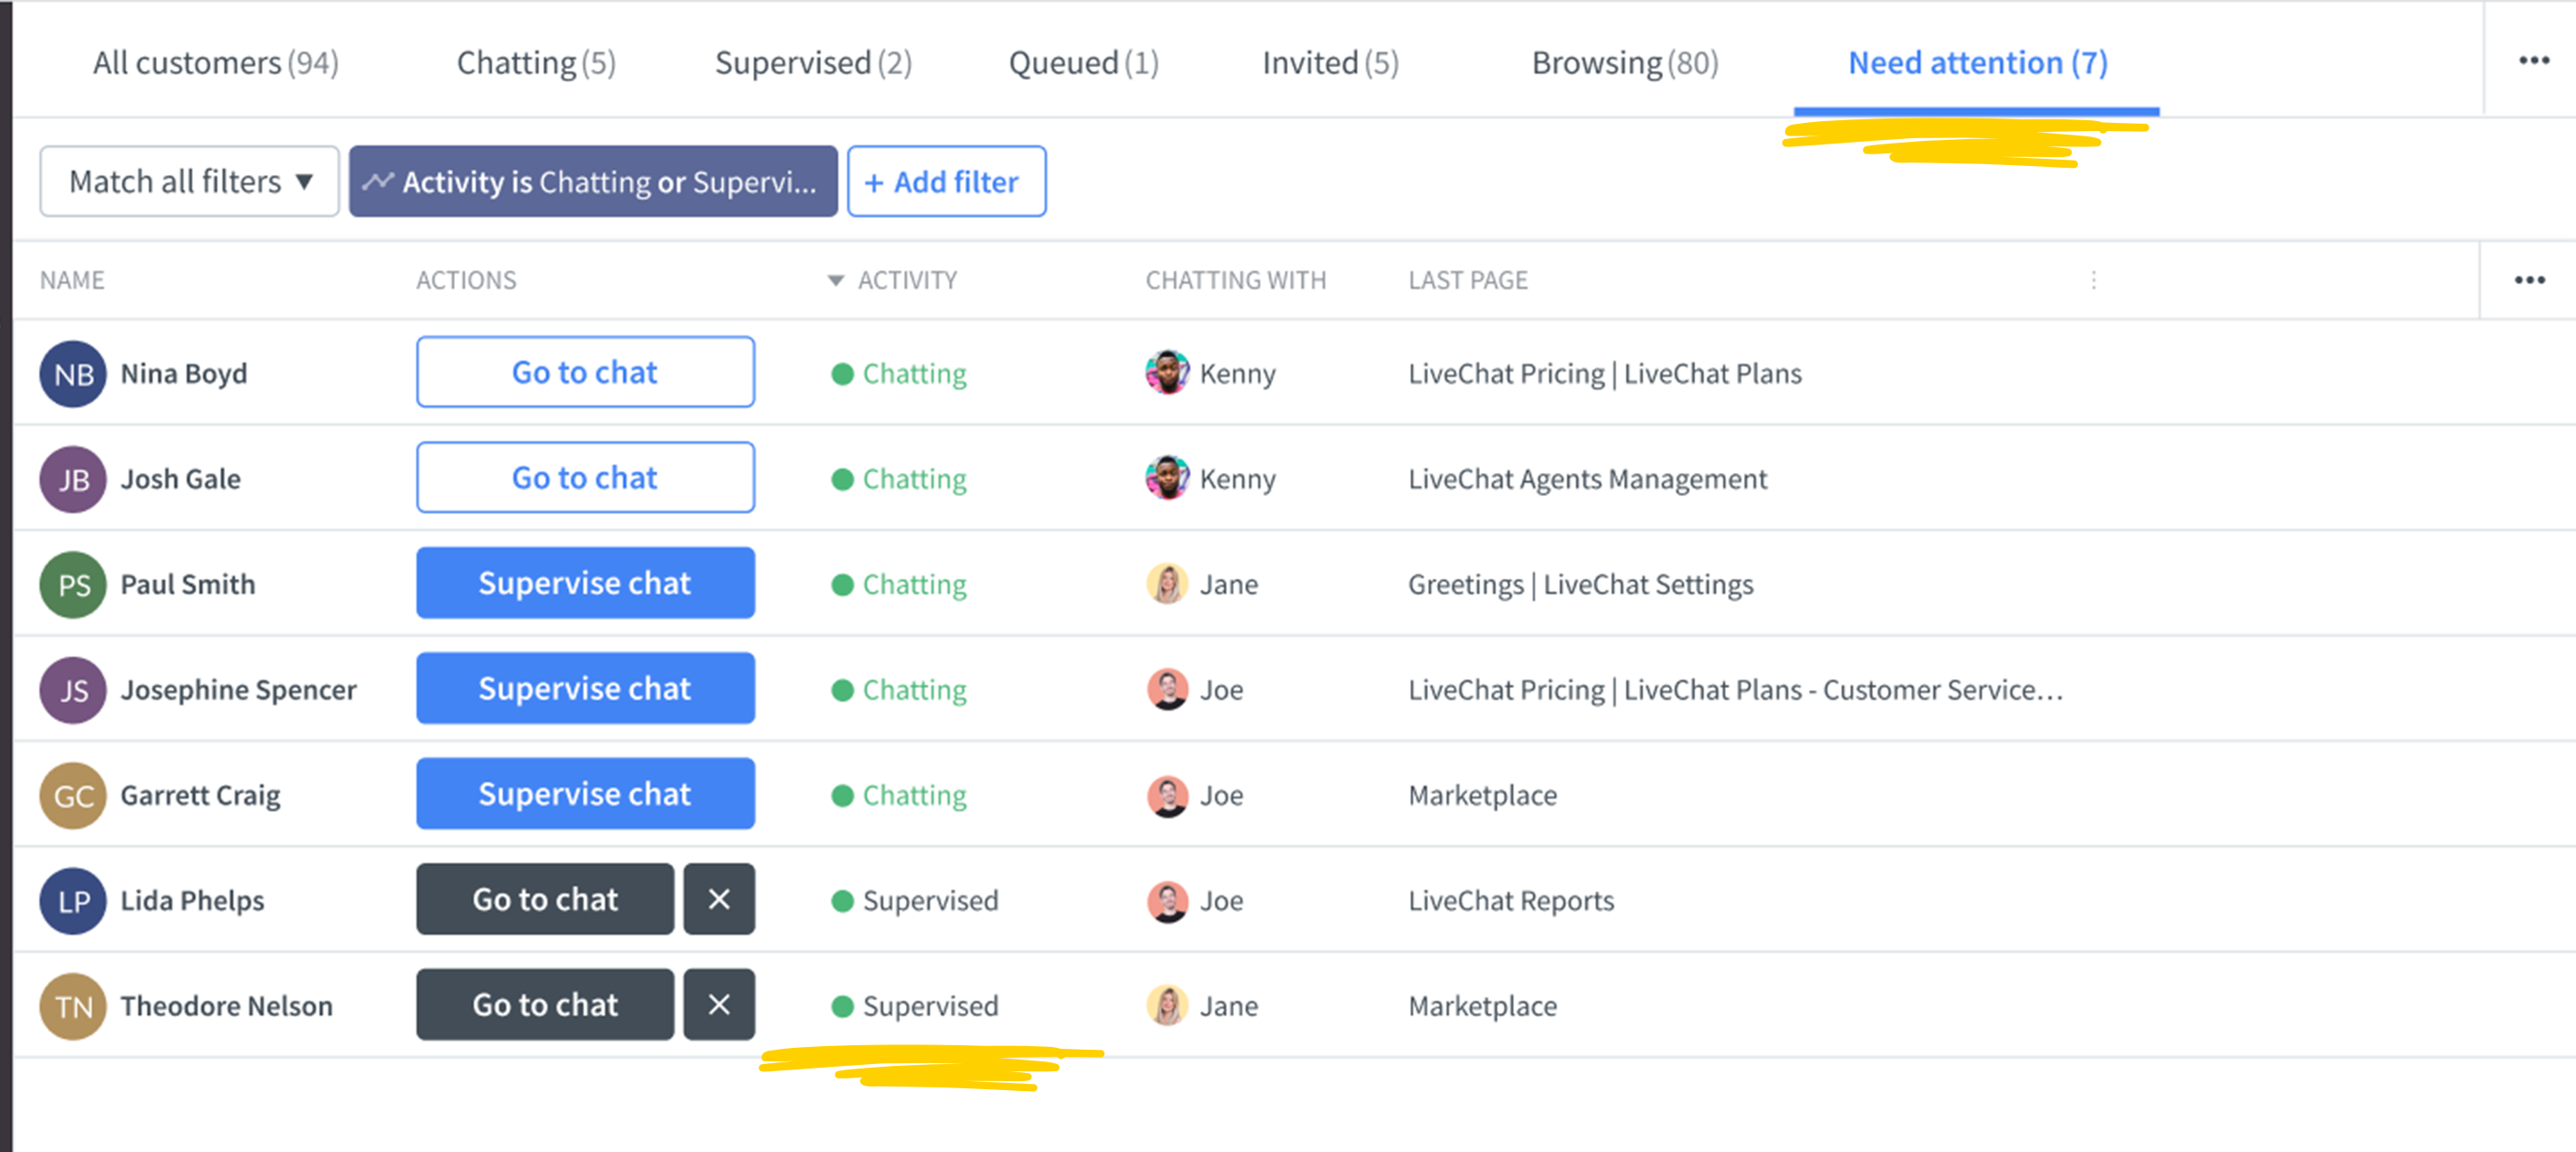
Setting filters
At the top of your Traffic section you can find filters. Use them to find and target a very specific group of users. For instance, users who have visited your website at least ten times and come from a specific country.
Please note that these settings are editable per user, not per license, so when you edit filters or segments - the change only affects your instance of the LiveChat app.
Please note that these settings are editable per user, not per license, so when you edit filters or segments - the change only affects your instance of the LiveChat app.
When using filters you can decide if you want the data to match all filters or any of them.
How to set a filter
1
Click on + Add filter.
2
Select a filter that you want to use.
3
Define the value(s) of the filter.
4
Add more values if needed.
5
Finally, click on Apply
That’s it. You can apply more filters by repeating these steps. If there are combinations of filters you use often, you can save such a combination as a segment.
The option to save custom segments is available in plans Team, Business and Enterprise.
The option to save custom segments is available in plans Team, Business and Enterprise.
Segments
With so many options, it would be really painful to set up the filters over and over again every time you log in to LiveChat. This is why we came up with segments. Segments are filter combinations you can access quickly.
By default, there are a number of predefined segments set up in the Customers section. In plans Team, Business and Enterprise, they can be edited, deleted, or added to.
By default, there are a number of predefined segments set up in the Customers section. In plans Team, Business and Enterprise, they can be edited, deleted, or added to.
At the top of your Traffic section you can see five segments (each one represents one of five activities):
Chatting - all visitors that are currently chatting with agents;
Supervised - all chats that you are supervising;
Queued - all chats that are in the queue;
Invited - all visitors that were invited to chat with a campaign but have not responded yet;
Browsing - all visitors who are currently on your website but haven’t been invited/haven’t started a chat.
There is an additional preset segment in the Starter plan: Left website - it shows all visitors who left your website since you visited the Customers section. To create such a segment in the other plans, set ‘Activity’ filter value to ‘Left website’ and save the segment.
There is an additional preset segment in the Starter plan: Left website - it shows all visitors who left your website since you visited the Customers section. To create such a segment in the other plans, set ‘Activity’ filter value to ‘Left website’ and save the segment.
How to create a new segment
Once you set up your filters as described here, you can save them to create your own custom segments.
1
When you have set up your combination of filters, click on Save segment.
2
Enter the name of your segment and click Create segment.
That’s it. You have created your custom segment! When you click on it, you will only see the customers meeting the preset criteria.
To manage your segments, click on the ellipsis in the topmost right corner. You can edit the names of your segments, change the order by dragging and dropping the name up and down the list, you can also delete segments there.
How to edit existing segments
While you can easily delete preset segments and create new ones, you can also fine-tune the existing segments. Say you have a group for VIP customers who you would like to prioritize in the queue (You can read more about managing groups here). You can edit the Queued segment by adding a VIP group filter. Or you are training an agent named Joe, so you need the Supervised segment to only show Joe’s chats.
1
Click on the segment you wish to edit.
2
The Activity filter is already implemented, add the other filters.
3
Click on Save segment
4
Pick Modify current segment. You can also edit the name of the segment here. Hit Save changes.
Voila! Your segment has been edited.
Inviting customers
The visitors of your website can be invited automatically through campaigns and manually in the Traffic section. In this section, we will show you how to invite customers manually.
You can invite a customer either by clicking on Start chat - then a standard welcome message will be sent. You can also send a customized message by clicking on the pencil icon. Which is highly recommended as personalized messages have higher response rates.
Chat supervision can be used to either check how your agents are doing or to train and help new members of your team. To supervise a chat, click on Supervise chat. You will covertly join the ongoing chat.
Neither the agent nor the visitor will know that you are now watching their conversation. If you want, you can write messages in the conversation that only agents can see (they appear as grey bubbles).
See this article for more information about supervision and chat transfer - both great ways to train new agents and work as a team!
RELATED ARTICLES
Using transfers and supervision
Learn more about using transfers and supervision during the chat. Those tools can be used to train new agents as well as for self-help between agents team.