

Tickets are a great tool that can extend your ability to keep in touch with your customers. When used correctly, they offer a way to reach you, even after working hours.
Tickets basics
There are quite a few ways to create tickets. For example, your customers can leave messages, via the ticket form, that appear as tickets in the LiveChat app. You can also create tickets inside the app. But at the end of the day, they are all stored in the Tickets section.
Below you can see a short overview of what’s inside the Tickets section.
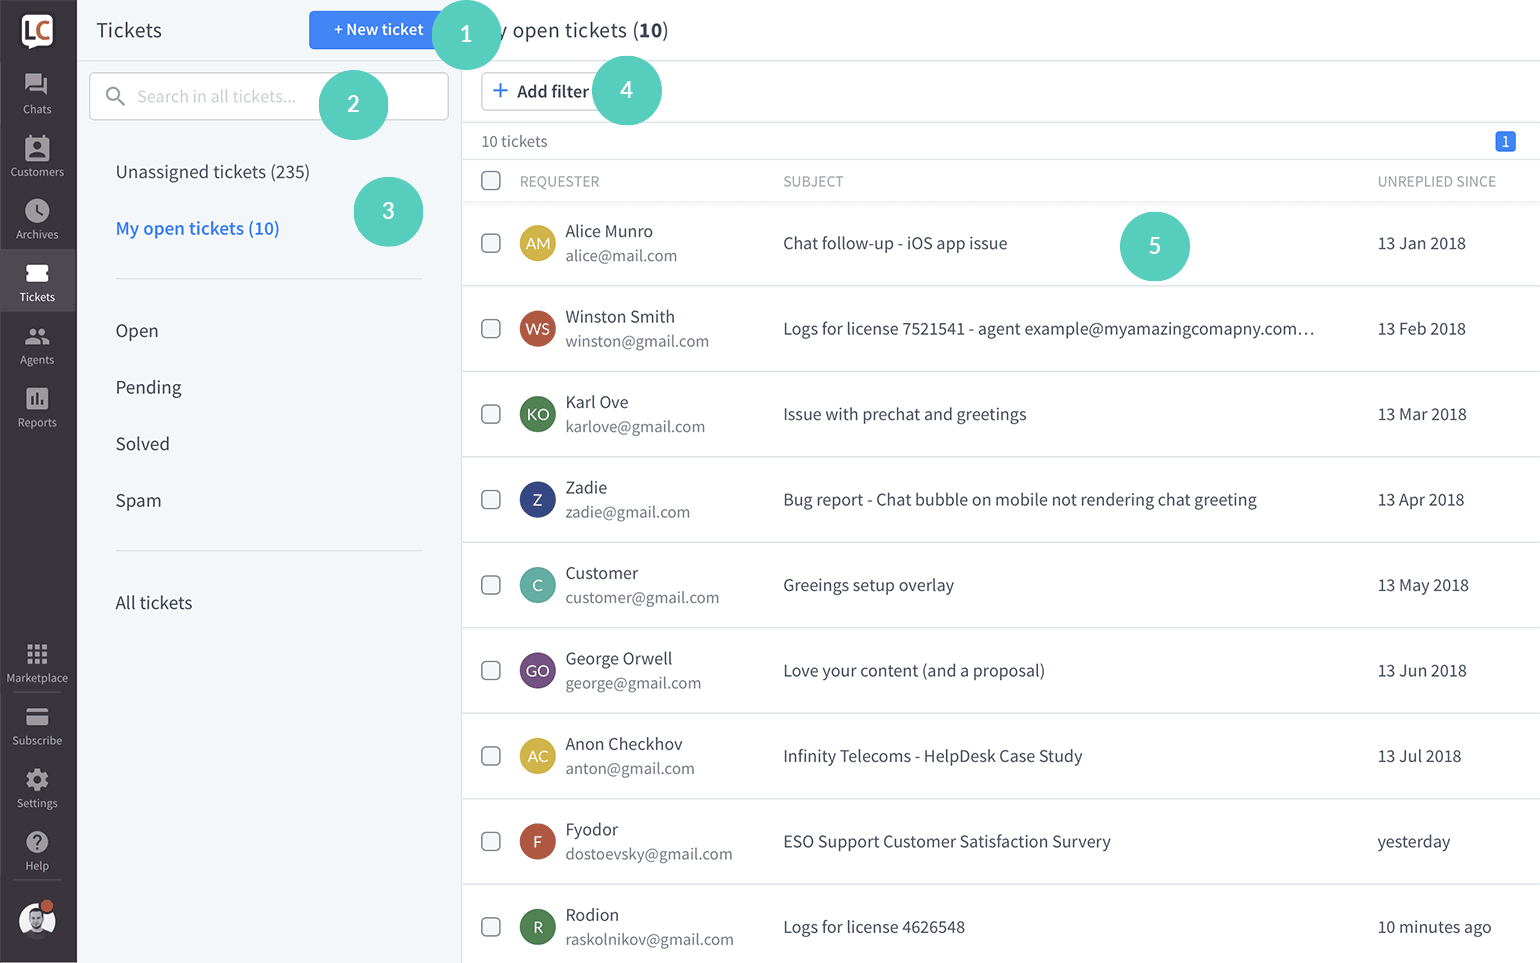
- New ticket—click on the button to create a new ticket.
- Search bar—type in details to find a specific ticket.
- Tabs—you can quickly access tickets that belong to different categories: unassigned tickets, my open tickets, open, pending, solved, spam. There is also a separate tab for all tickets on the license that you have access to.
- Add filter—use filters to narrow down the tickets list.
- Ticket list—hover over a ticket to see a preview. Click on one to open it.
Once a ticket has been created, you can edit it, reply to the customer, add tags and many more. Below you can see what you can find in the single ticket view.
- Ticket subject—edit it by clicking on the pencil icon.
- Ticket feed—the entire ticket history.
- Text area—here you can reply to the ticket, create a private message, add files and change ticket status.
- Ticket info—basic information about the ticket; you can find and copy the ticket URL here.
- Assignee—see, add and change the agent assigned to a ticket.
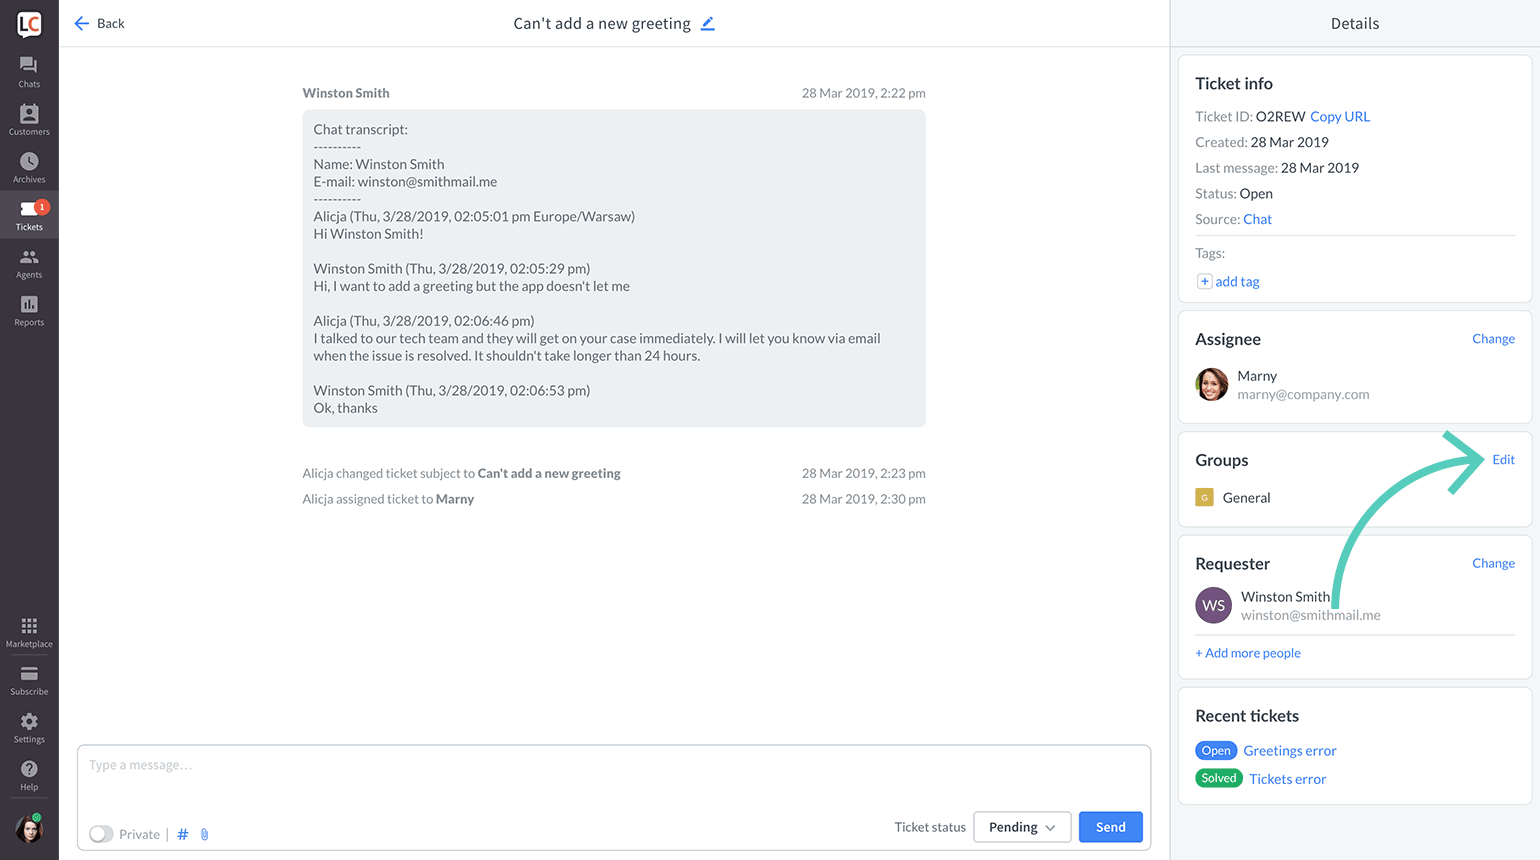
- Groups—check, add and remove groups.
- Requester—see and change the customer’s name and email; you can also add additional people to keep them in the loop.
- Recent tickets—all tickets that are assigned to the same email.
Create a new ticket & other ticket sources
There are four ways of getting new tickets. Each way has its specific application:
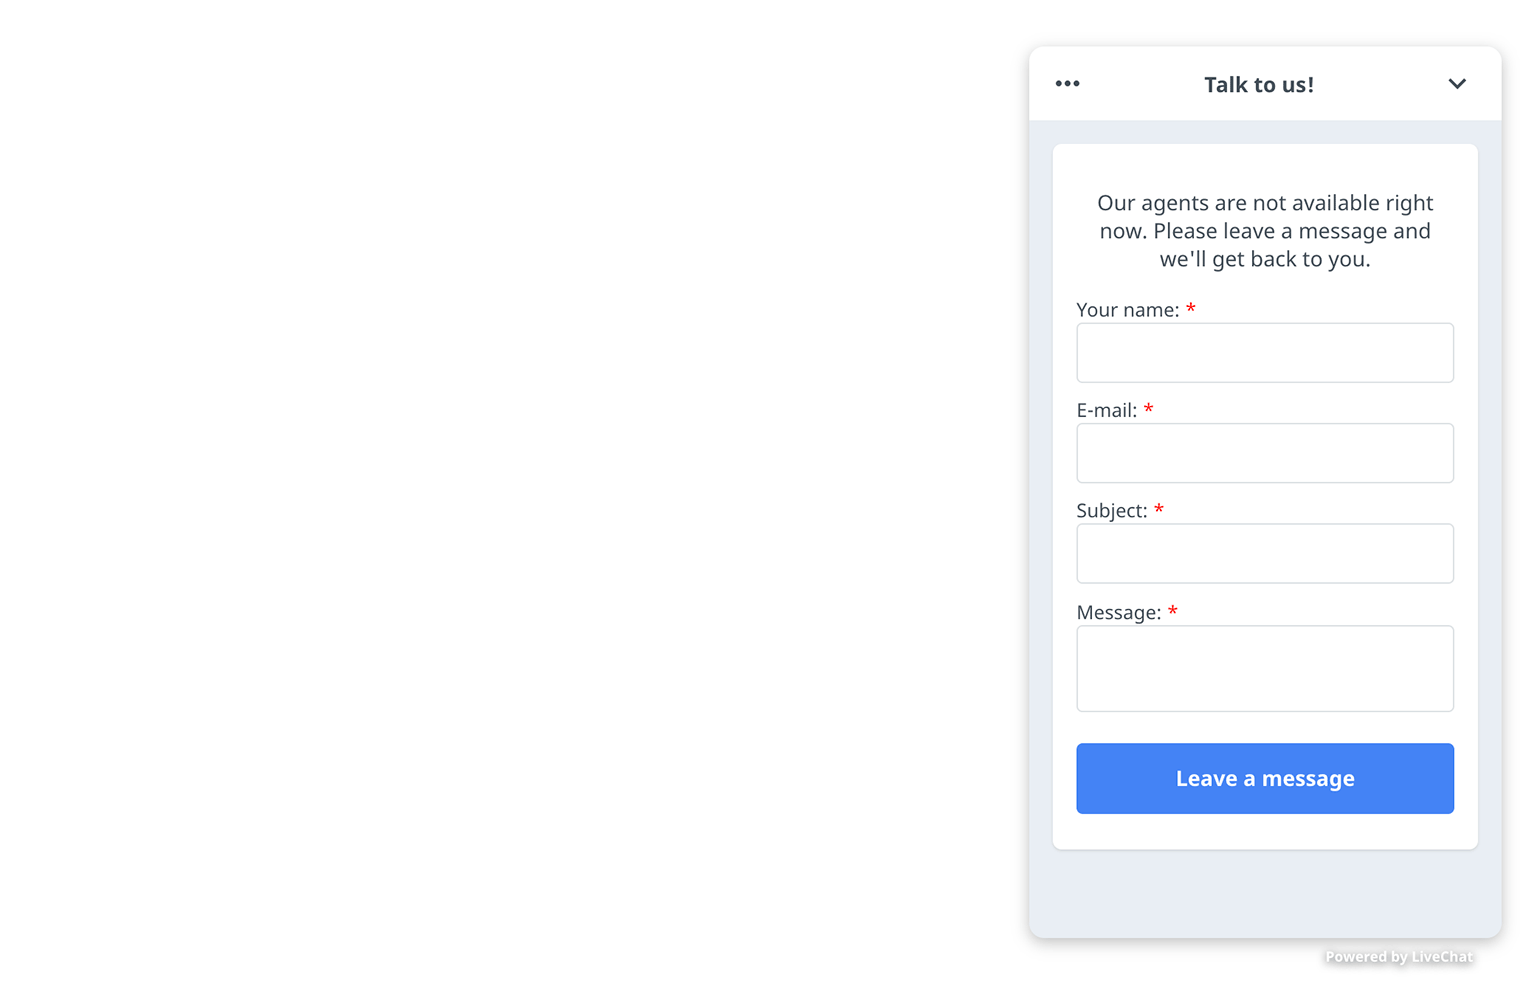
Tickets from the ticket form
When all your agents are away, a ticket form appears in the chat widget. This is where customers can leave messages for the agents to answer when they are back at work. These messages appear as tickets in the LiveChat app.
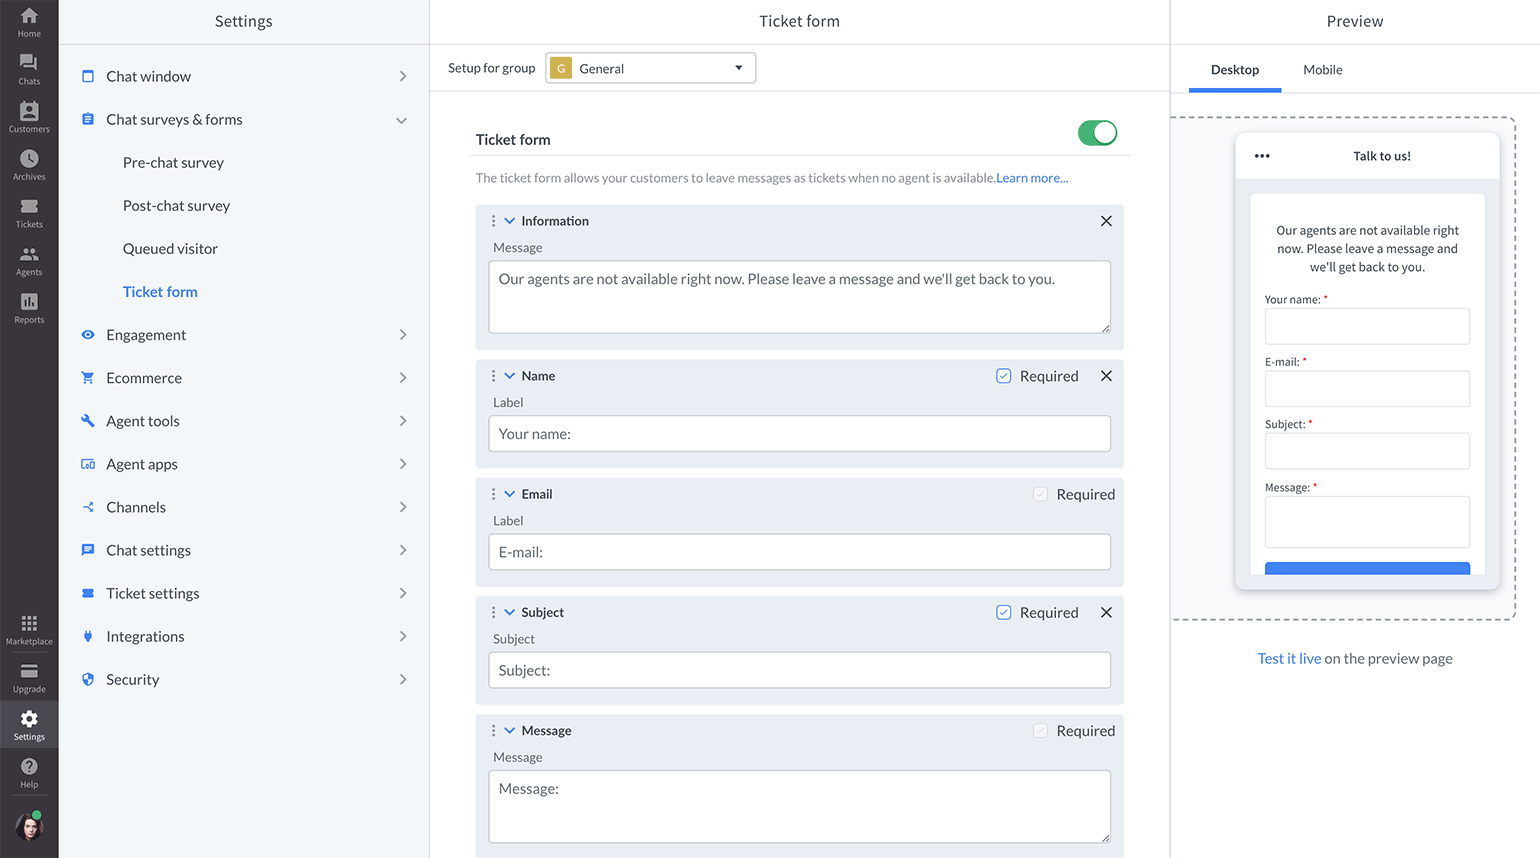
Configure ticket form
You can change the displayed message in Settings → Chat surveys & forms → Ticket form. Configure the form by adding and editing various fields. You can use Markdown to format the Message text in the Information field. See this article for more details. Remember to click on the Save changes button when you’re done.
Tickets from email
If you forward your support emails to LiveChat’s ticketing system, you can reply to your support communication via tickets in LiveChat.

Select your email provider:
Gmail
To set up forwarding in your Gmail account, complete the following steps:
- Log in to LiveChat and go Settings > Channels > Email.
- Enter your email name (it will be displayed as the sender of your tickets) and click on the Save button.
- Copy your forwarding email address assigned to your account.
- Go to Gmail forwarding settings and click on Add a forwarding address to proceed.

- Enter the copied email and click on Next.

- Then confirm by clicking on Proceed button.

- A confirmation email should appear as a ticket in your LiveChat. Confirm the forwarding to finalize the setup.
Starting now, all emails from this account will be forwarded to your LiveChat as tickets.
Yahoo! Mail
Setup forwarding on your Yahoo! account by completing the steps below:
- Login to your Yahoo account and select Mail options from the Options menu.
- Choose POP & Forwarding option.
- Next, pick Set up or edit POP & Forwarding.
- Check the Forwarding option.
- Log in to LiveChat and go Settings > Channels > Email.
- Enter your support email name (it is displayed as the sender of your tickets) and click on Save.
- Copy the email address assigned to your account and enter it in Yahoo! Forwarding options.
- Click on the Save button at the bottom of Set up or edit POP & Forwarding page to finalize the setup.
Microsoft Exchange
Follow the instructions below to set up email forwarding in Microsoft Exchange:
- Create a new contact in Active Directory and name it LiveChat tickets.
- Log in to LiveChat and go Settings > Channels > Email.
- Enter your support email name (it is displayed as the sender of your tickets) and click on Save.
- In the second step, copy the email address assigned to your account and add it to the newly created contact.
- Access properties of the newly created contact and enable forwarding on the email address you use for support, e.g. support@company.com.
Other email providers
You can set up forwarding for other email providers too. If you are using another system to handle your emails, you just need to create a forwarding rule that will forward all emails from your support email address, for example, support@mail.com, to the address available in the Email section.
Tickets from chats and chat archives
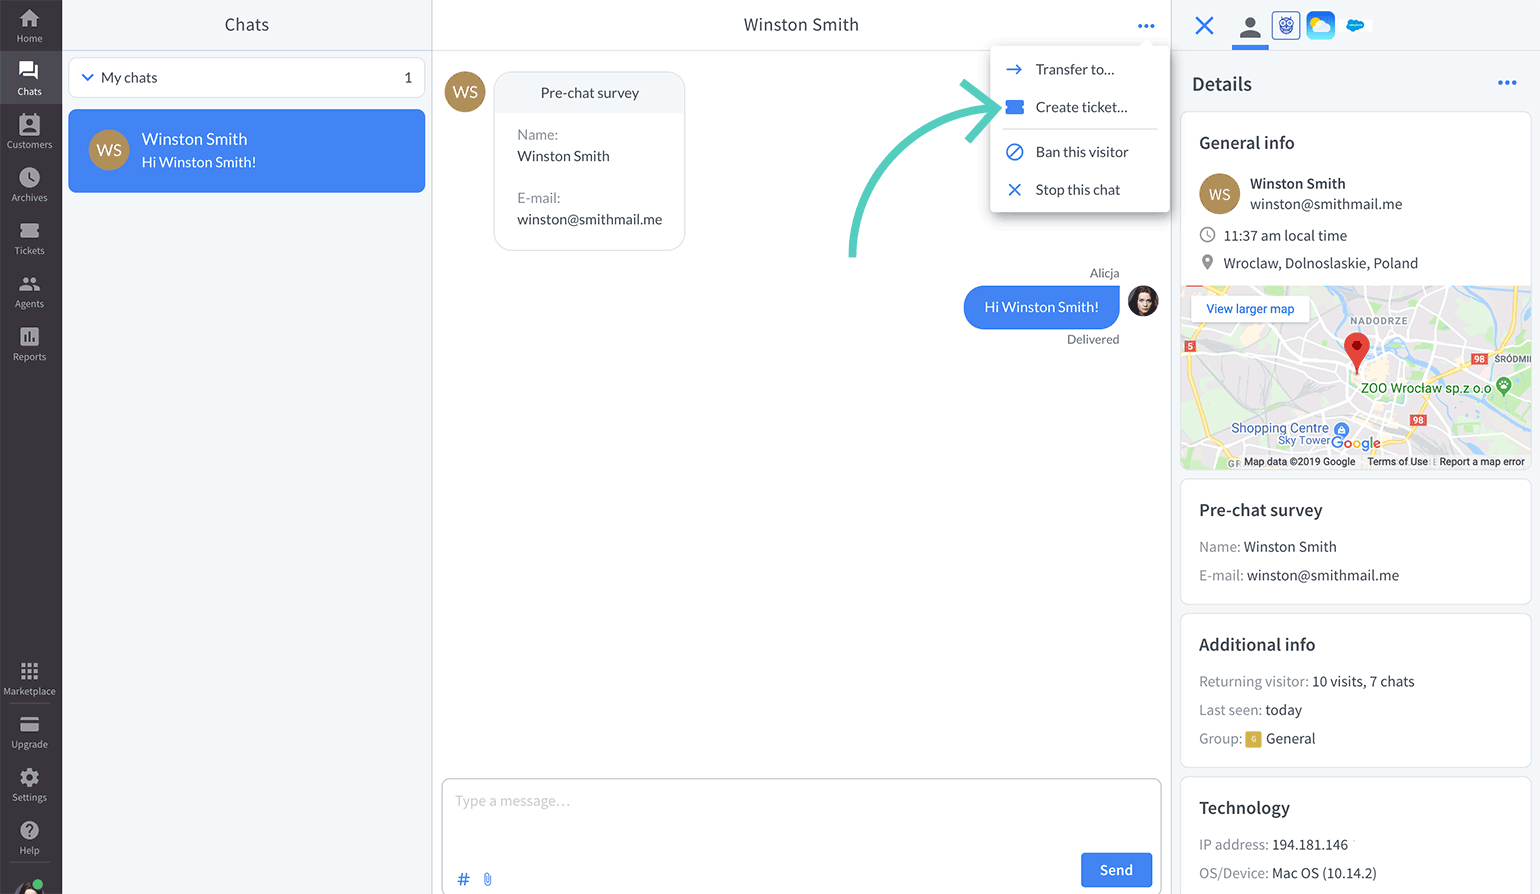
You can add tickets manually during a chat. When chatting with a customer, click on the More button and choose Create ticket from the menu.
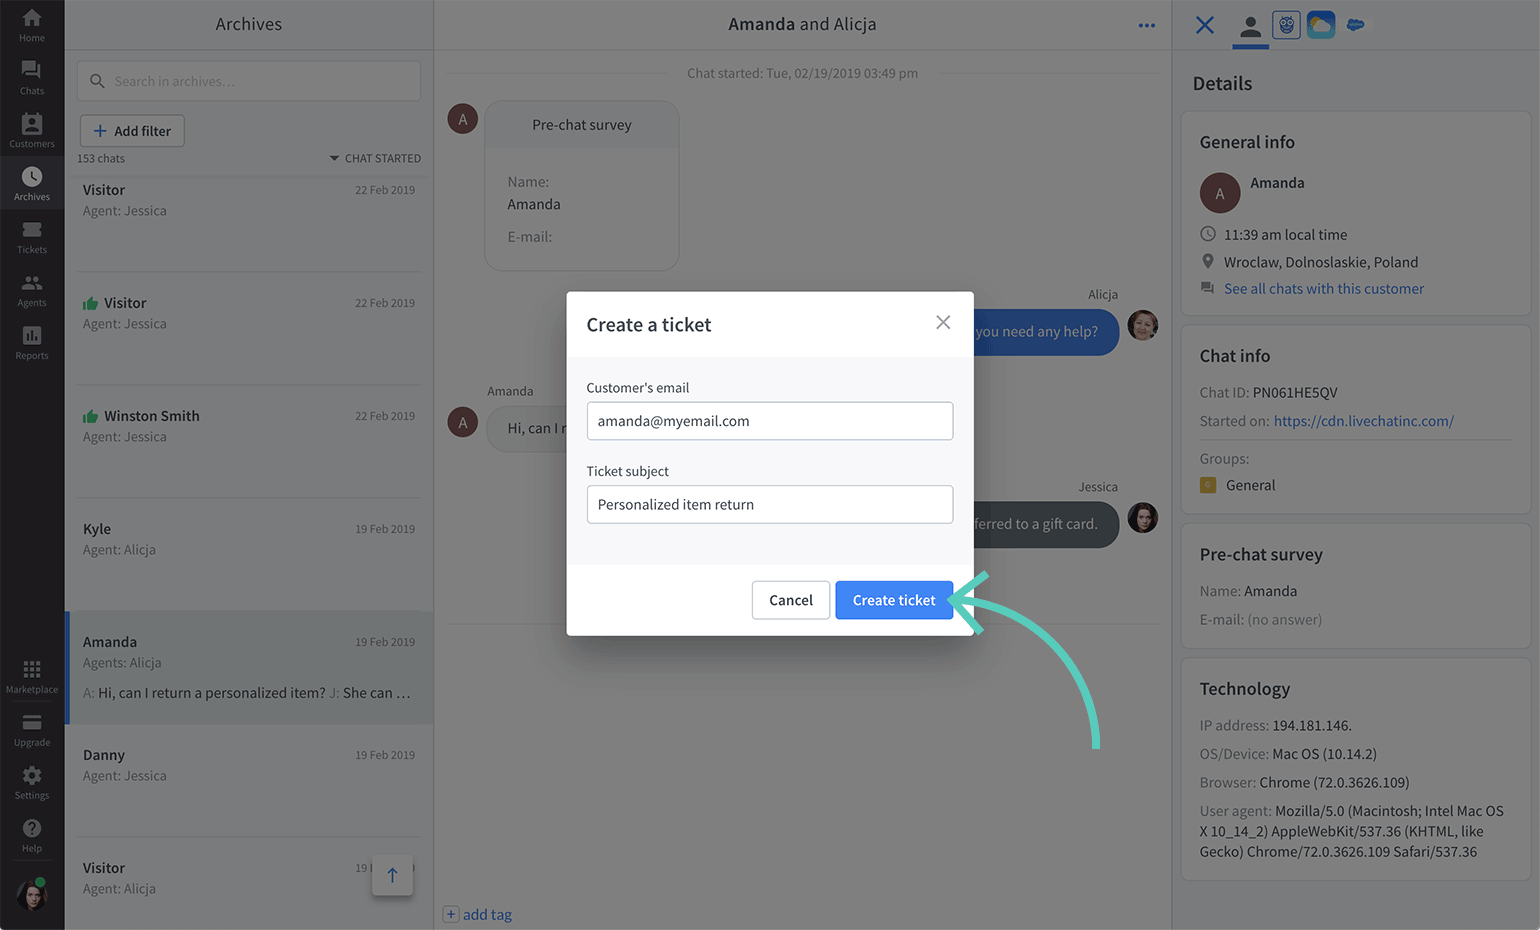
Type in the customer’s email and the ticket’s subject. After you do that, click on the Create ticket button to finalize.
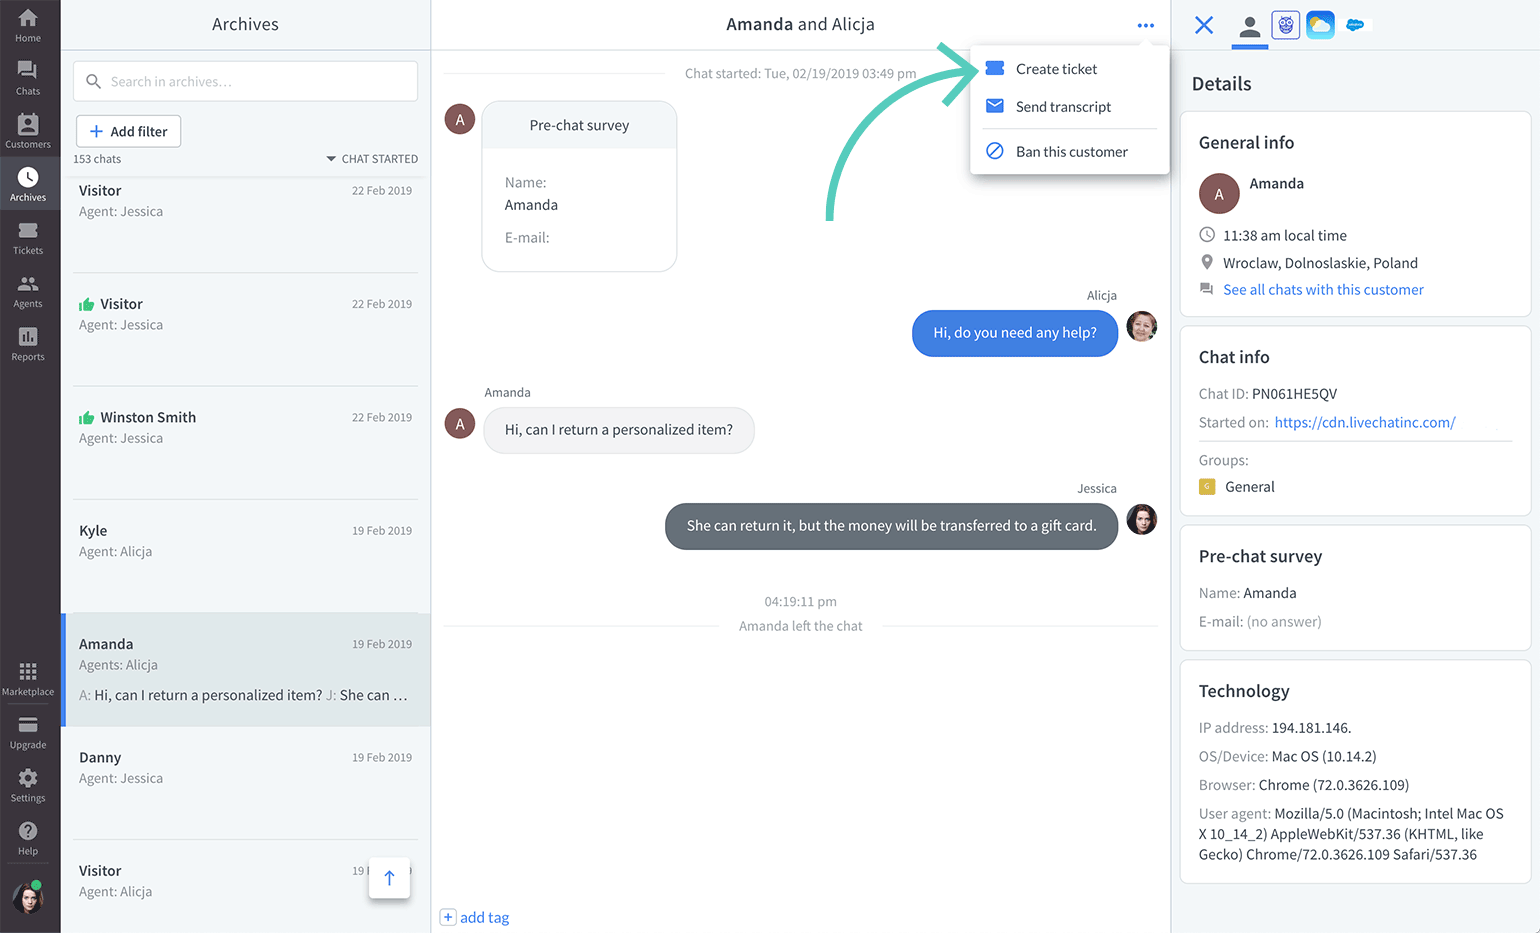
After the chat ends, you can still create a ticket from this chat in the Archives section. Simply find the particular chat, open the More menu in the top right corner and click on the Create ticket.
Tickets created in the Tickets section
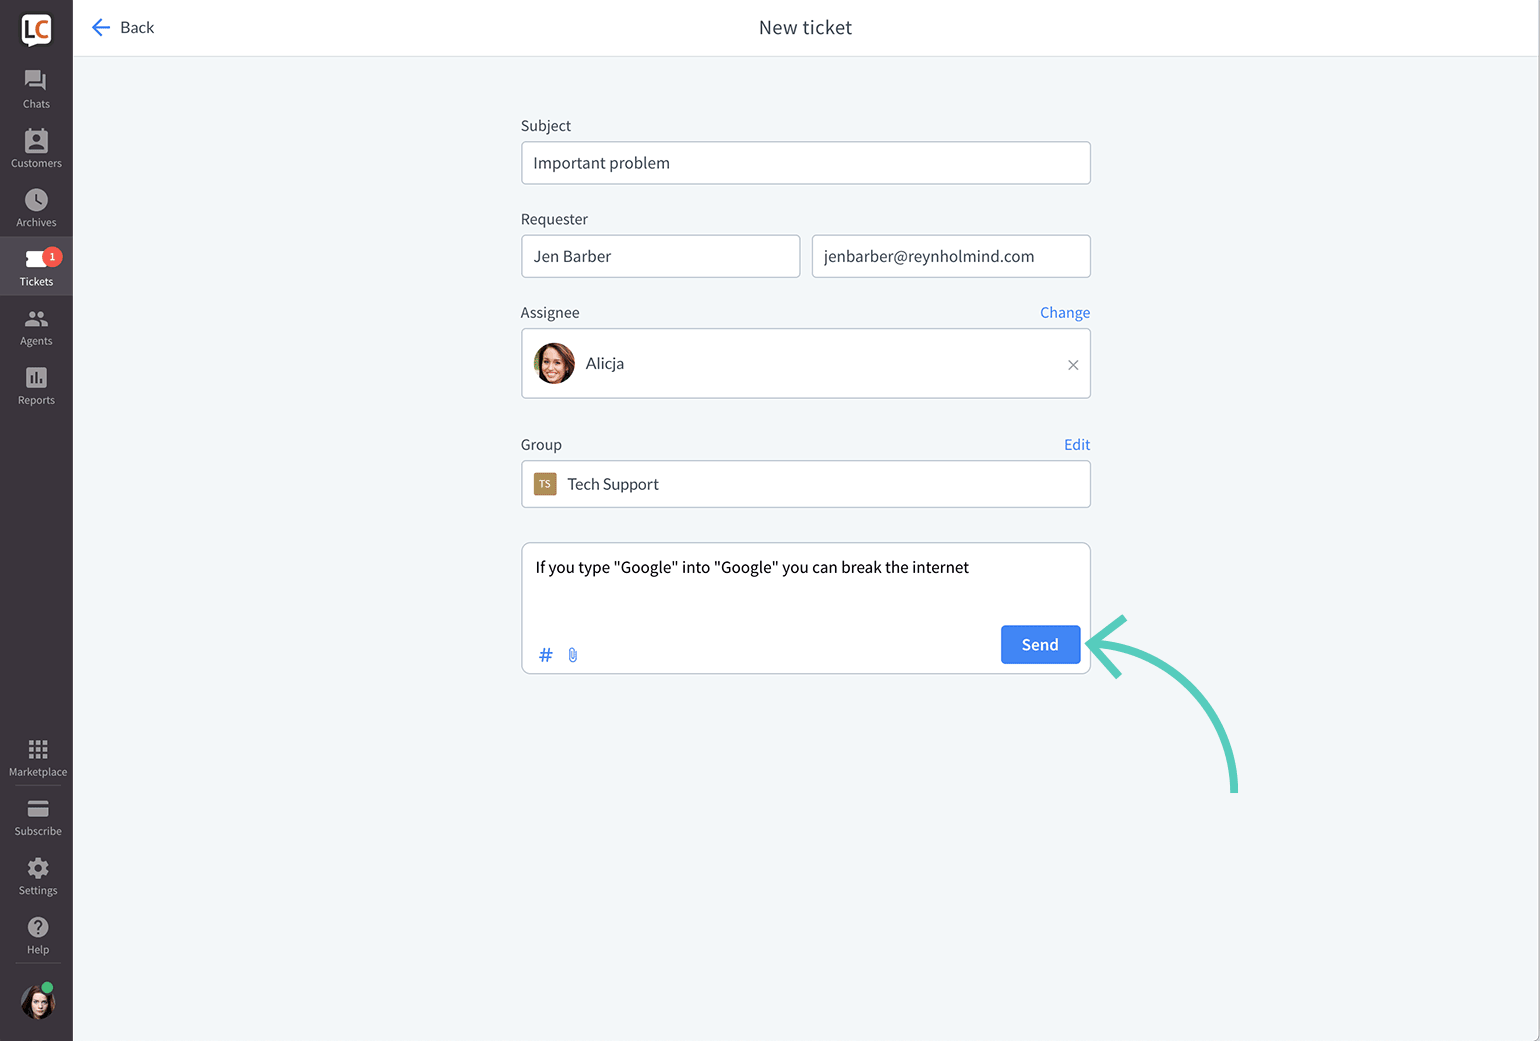
Finally, the Tickets section offers an additional way to create tickets manually. First, click on +New ticket.

Then, fill in the details, and describe the case. Click on the Send button to finalize.
Change the agent/group assigned to a ticket
Once you have created a ticket, you can either handle it all by yourself or, if this is a case that requires the assistance of another agent, you can change the person or group assigned to the ticket.
Change the agent assigned to a ticket
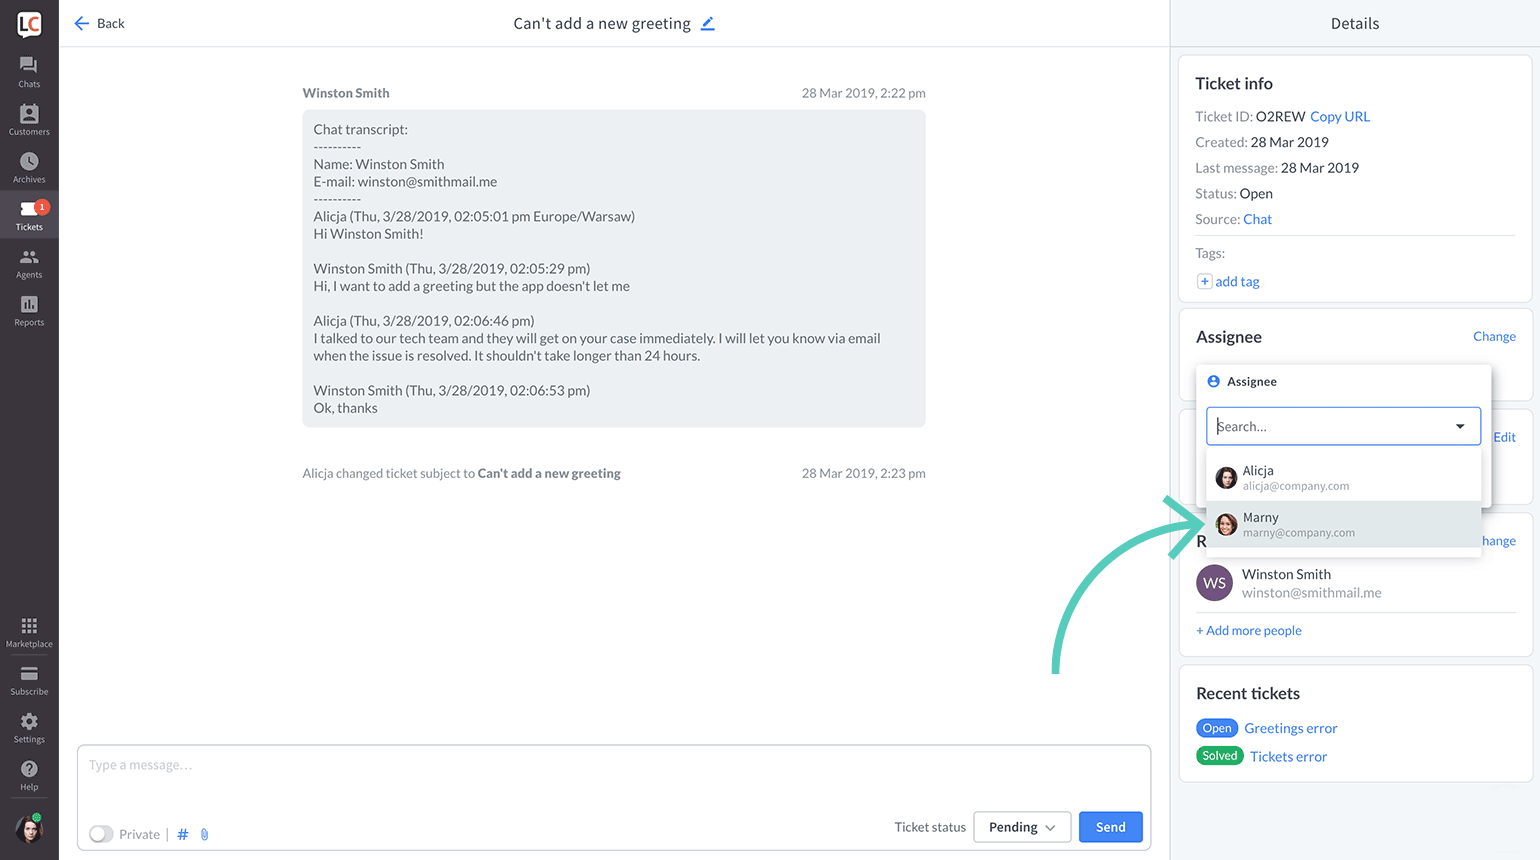
- Open a ticket.
- Click on Change assignee in the details bar.
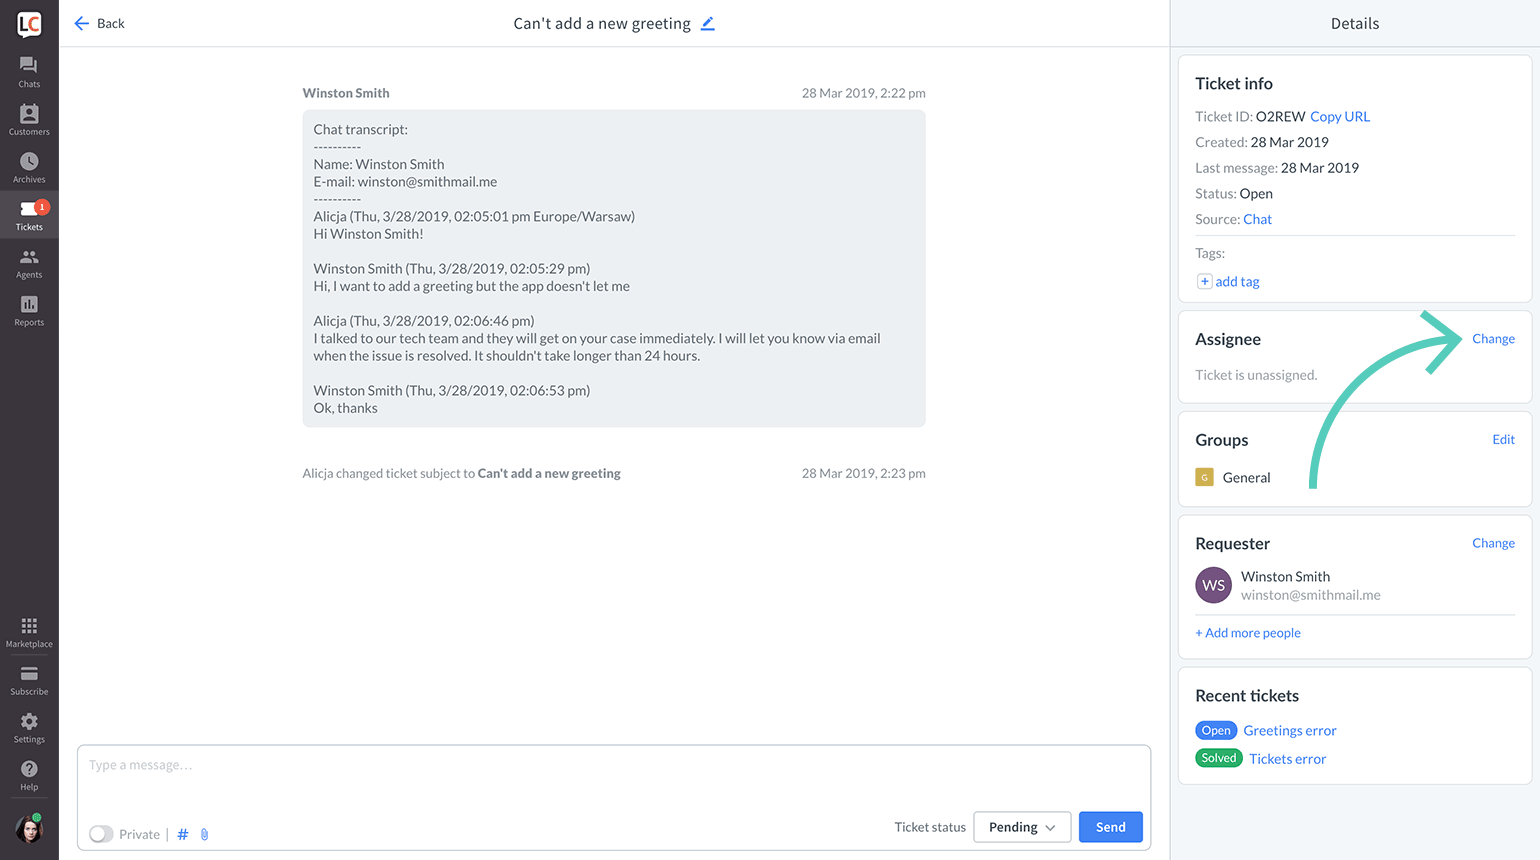
- Choose an agent from the list.
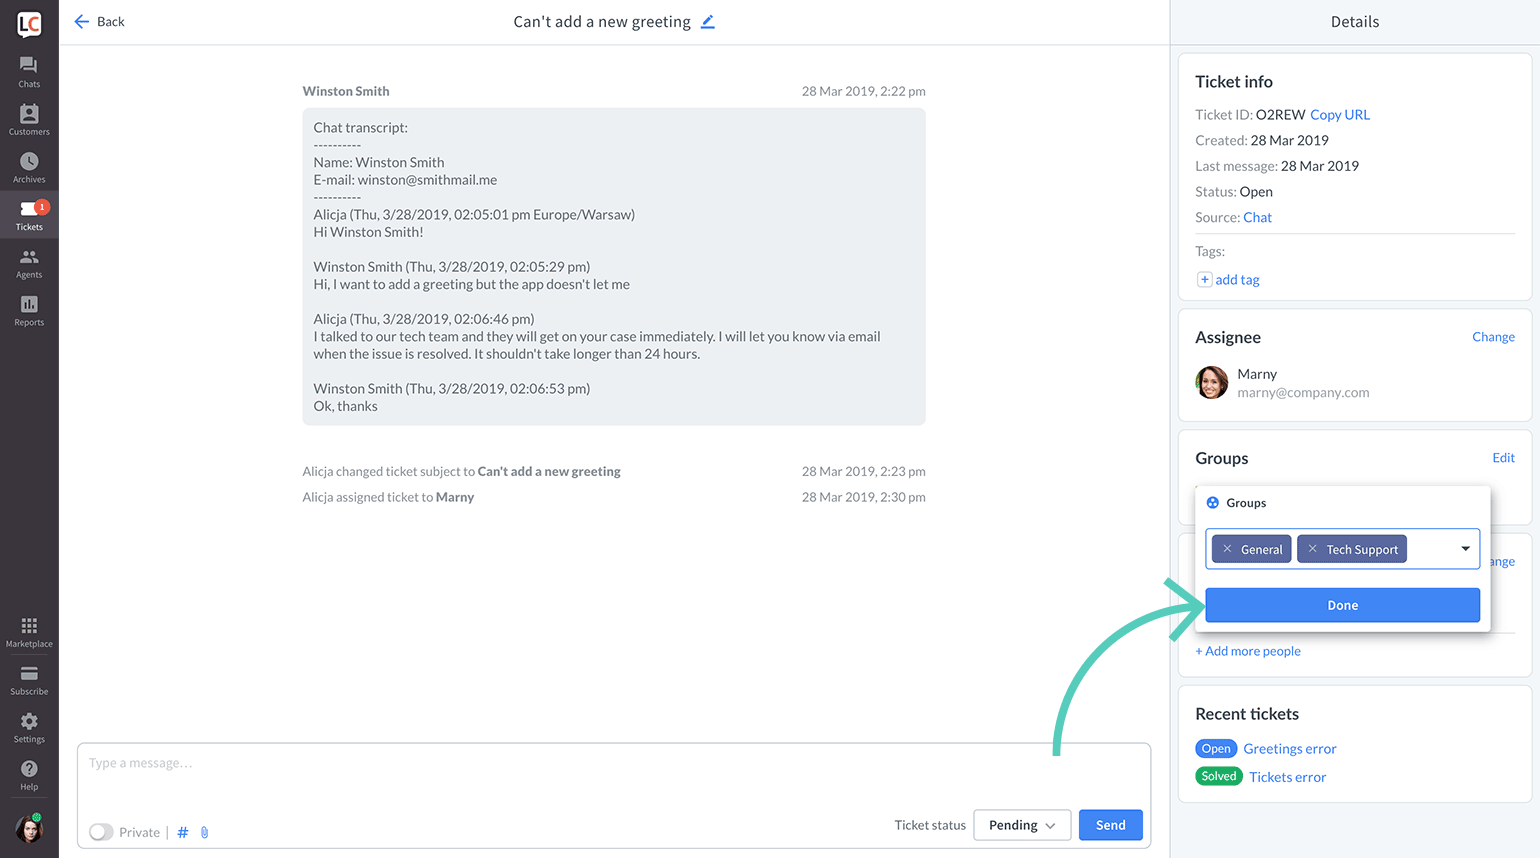
Change a group assigned to a ticket
- Open a ticket.
- Click on Edit groups in the details bar.
- Choose a group from the list. To remove a group click on the x next to its name
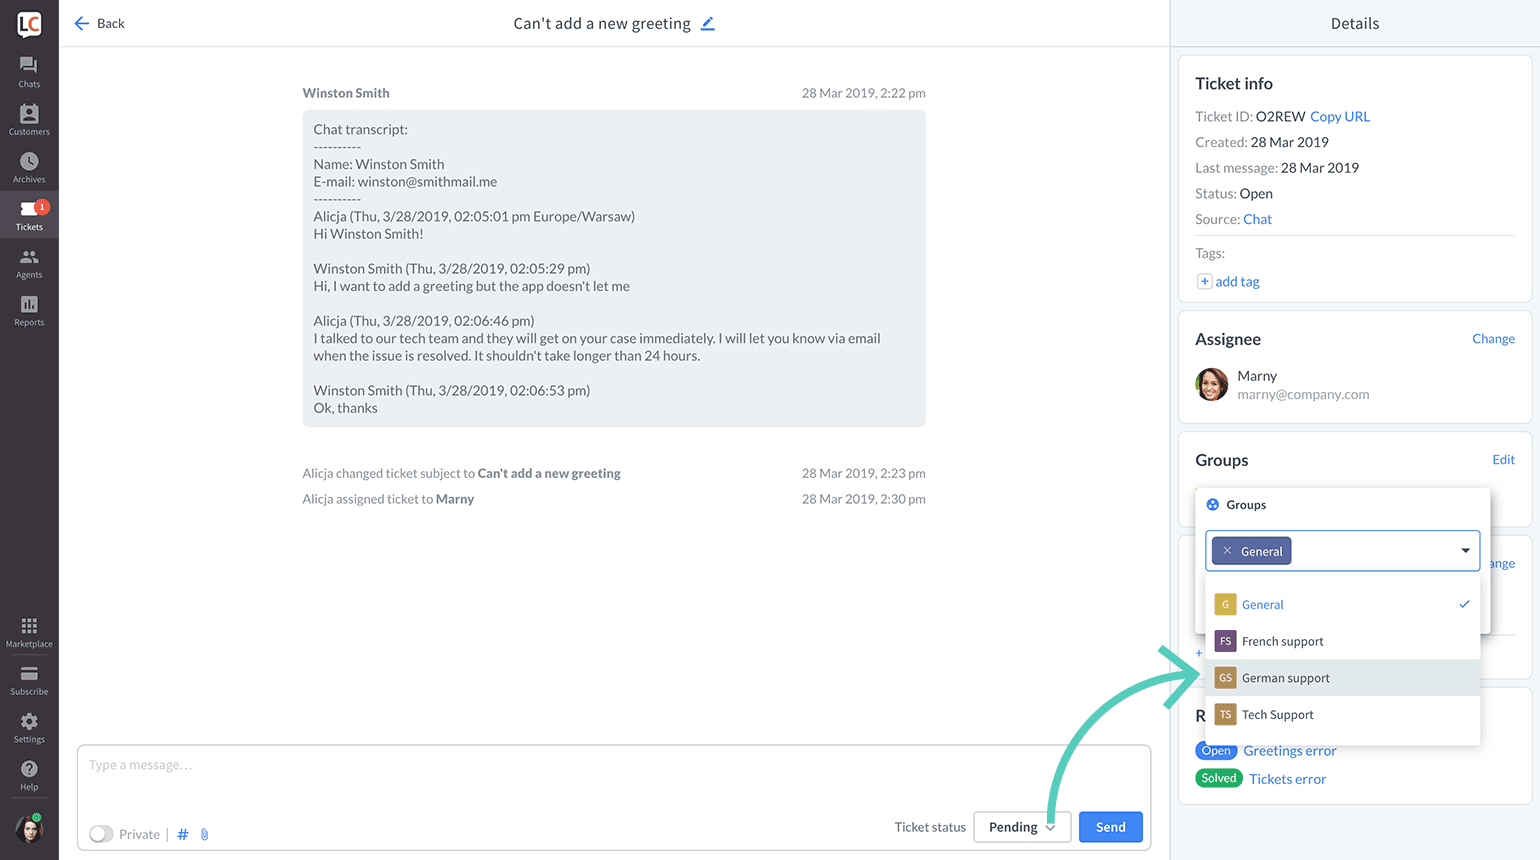
- Click on Done when you are finished.
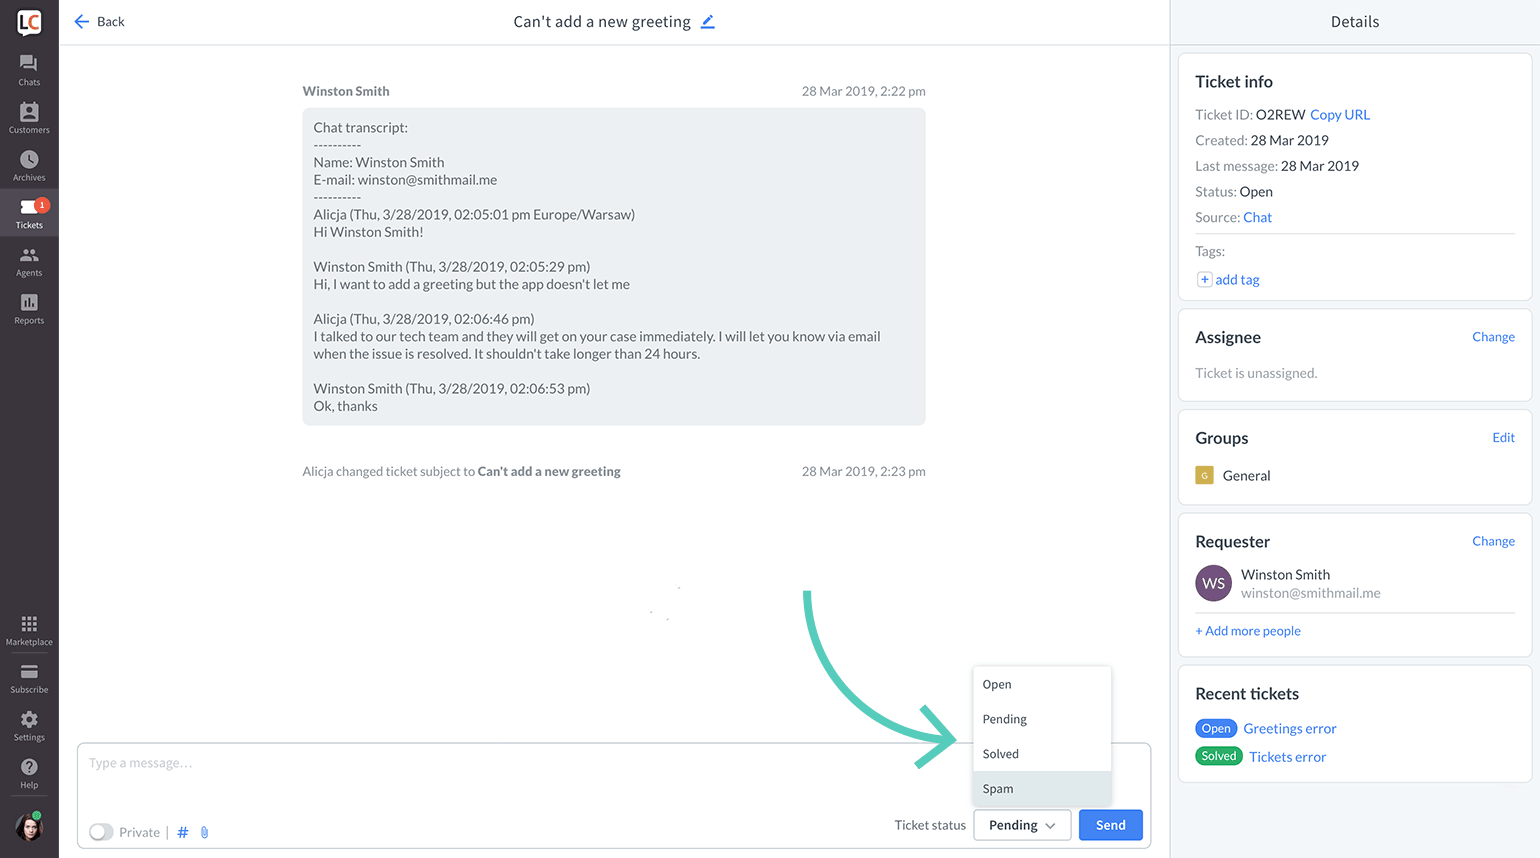
Change ticket status
You can assign four different statuses to your ticket.
- Open tickets are cases that await action from the agent. All new tickets get the Open status.
If the customer responds to a Pending or Solved ticket, its status will be changed to Open automatically. - Pending tickets are cases that await a response from the customer. When you reply to an Open ticket, its status will automatically switch to Pending. After the customer responds, the ticket will switch back to Open.
- Solved tickets are cases that are completed. Mark tickets as Solved only if you are sure that your customer received all the answers.
- Spam is a category reserved for malicious or otherwise unnecessary tickets.
Once you place a ticket in your Spam folder, sender’s email address gets blacklisted, and all their future messages send from the same email address will land in the Spam folder.
To change the status of a ticket, open it and select its new status from the drop-down menu in the bottom right corner. Confirm the change by clicking on the Send button.
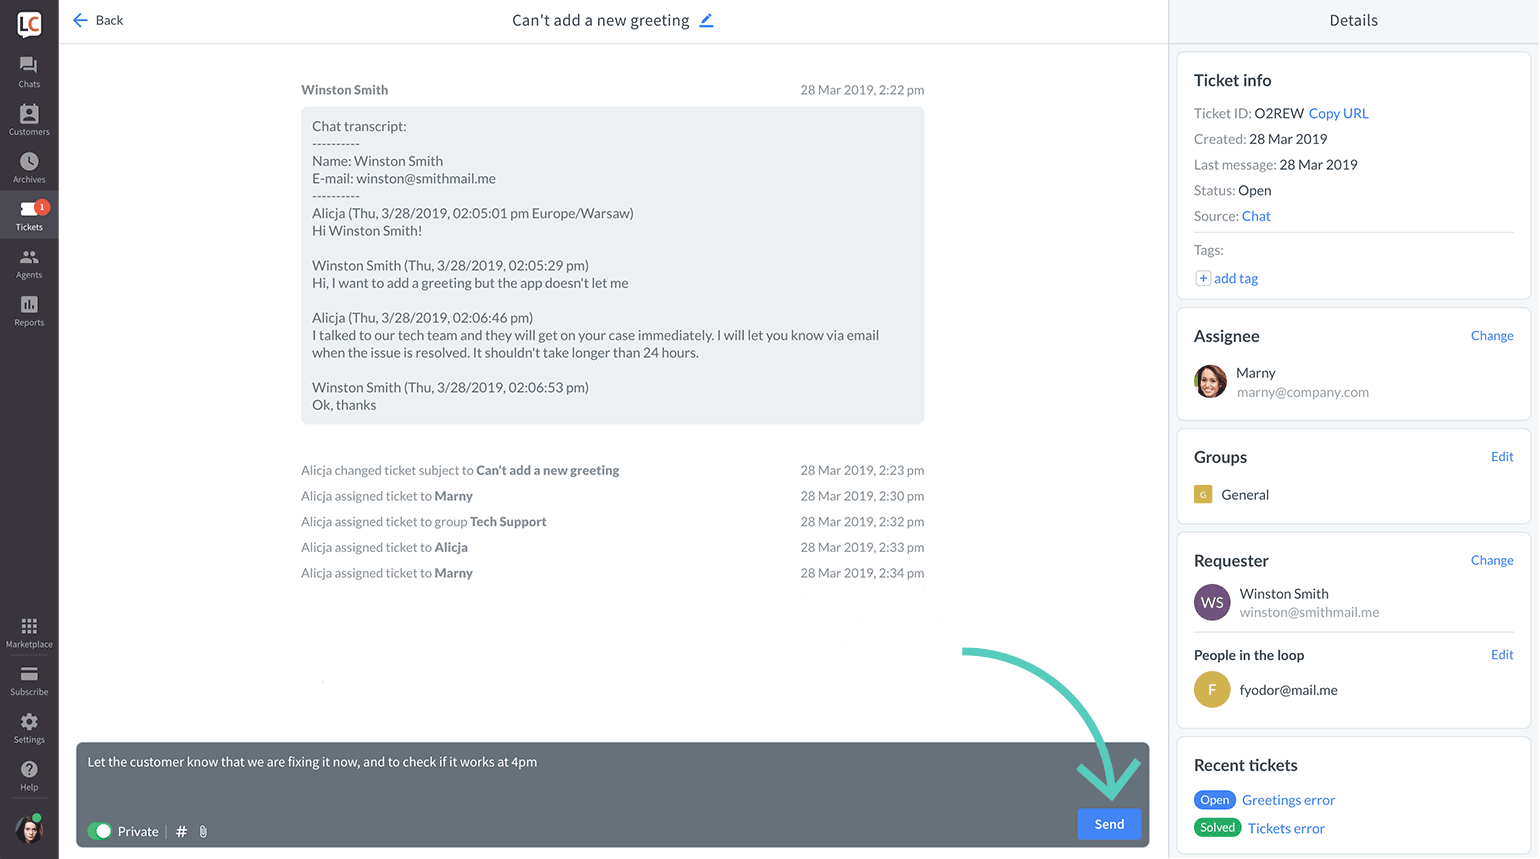
Add private messages to a ticket
When managing your tickets at LiveChat, you can use the private message feature to make some notes about the case or describe the ticket before passing it to a different agent. Which makes it easier to understand the case better and take care of it instantly, instead of reaching out to you again.
To use the private messages option, open a ticket and enable the Private switch.

Now, enter your message and click on Send.
New ticket email notification for agents
Agents can receive a notification email whenever you receive a new ticket. To enable those emails, follow these steps:
- Go to the Team section.
- Double-click on the agent on the list or select
...button and then Edit from thedrop-down menu. - Check the New ticket notification option.
- Click on Save changes when you are done.

By replying to the email, you or your agents can directly respond to the tickets from their inbox. The ticket will be automatically assigned to the agent that replied to the ticket.
Automatic ticket notifications for customers
There are three types of ticket-related emails that are sent automatically. Two of them can be managed in Settings:
- New ticket notification — a customer gets an email notifying them that a ticket has been created. The customer can respond by replying to the email.
- Ticket rating request — sent 24h after a ticket was solved. It prompts the customer to rate the quality of customer service they received. Stats can be later viewed in the Ticket satisfaction report in the Reports section. Read more about ticket ratings.
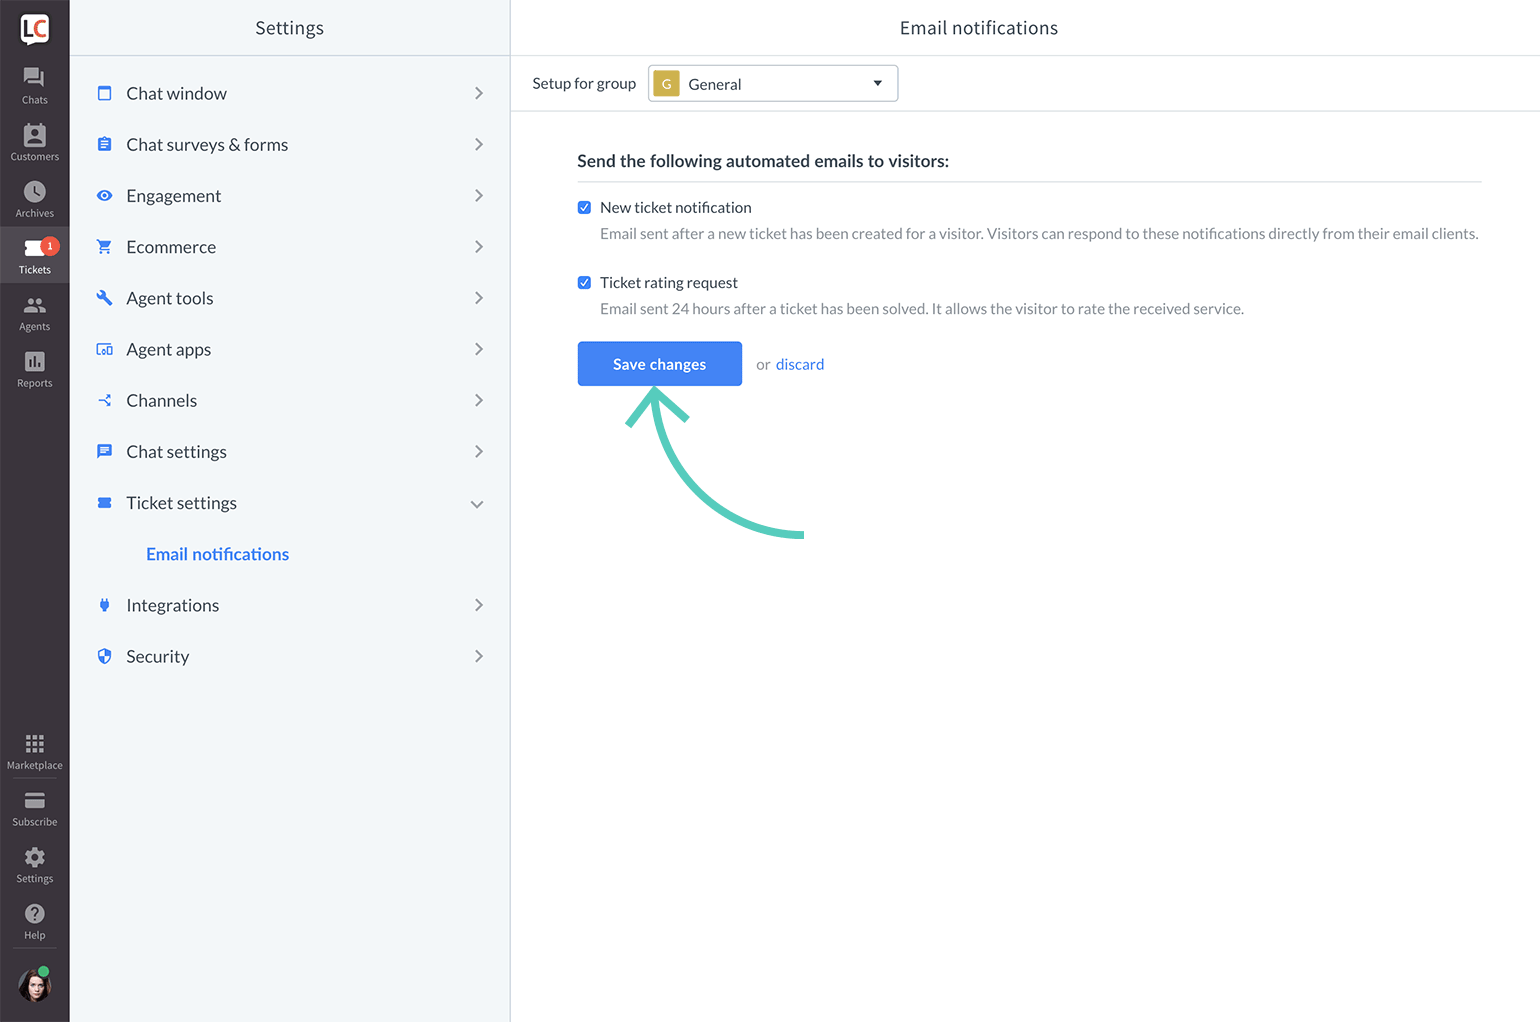
To enable or disable those emails follow these steps:
- Go to Settings → Ticket settings → Email notifications.
- Check emails that you want to send and uncheck ones that you don’t want to send.
- Once you are done, click on the Save changes button to finalize.
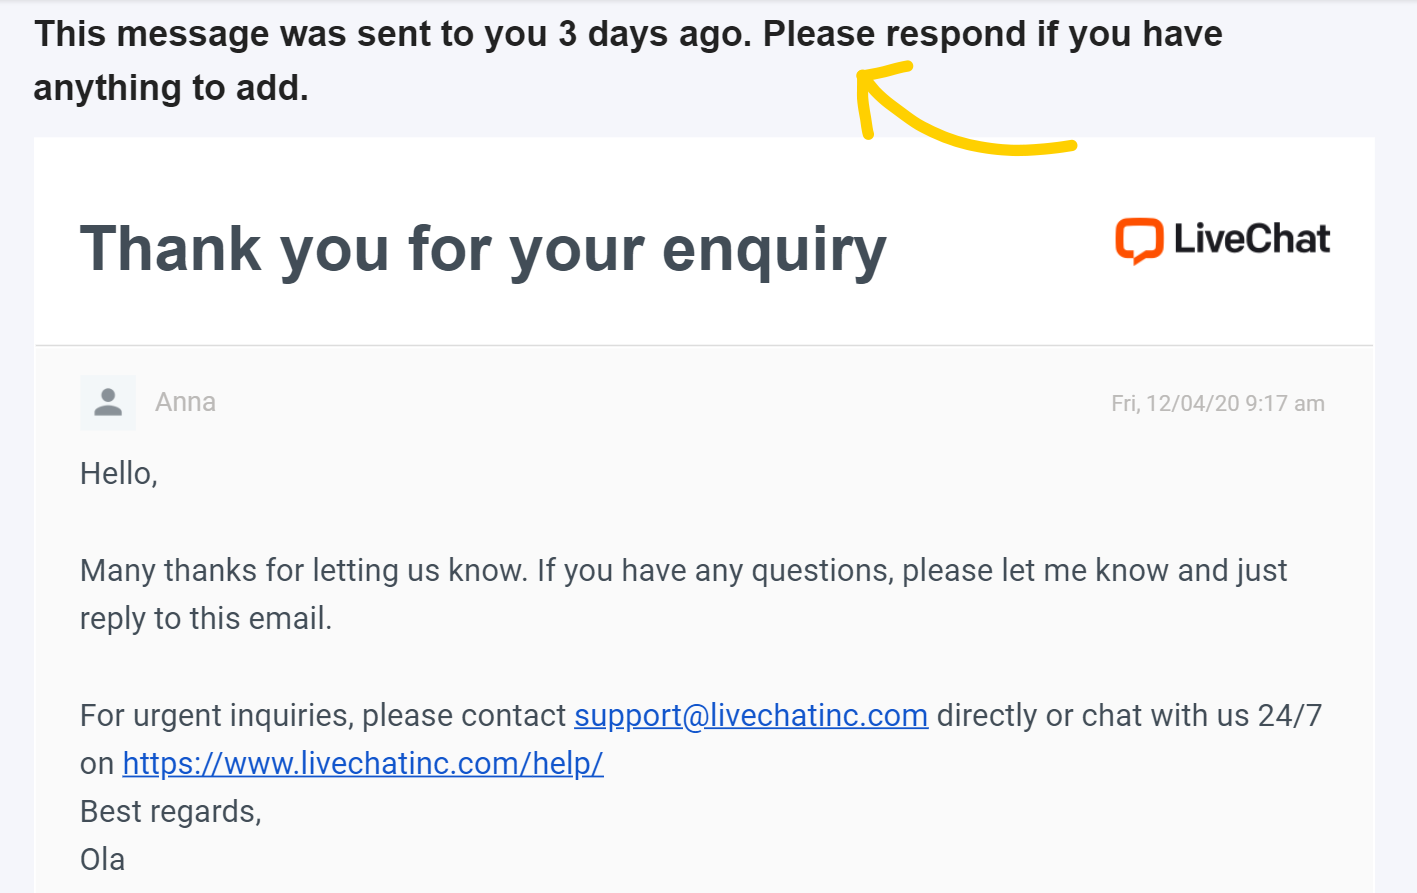
The third automatic email is the follow-up email. When an agent responds to a customer’s ticket, the status of this ticket changes from Open to Pending. If the customer does not respond to your agent’s message in three days, they receive an automatic follow-up, to make sure they have not missed the message from your agent. It includes the original message and an additional reminder at the top:
In the LiveChat Agent app, the agent will also see a system message about the follow-up being sent:
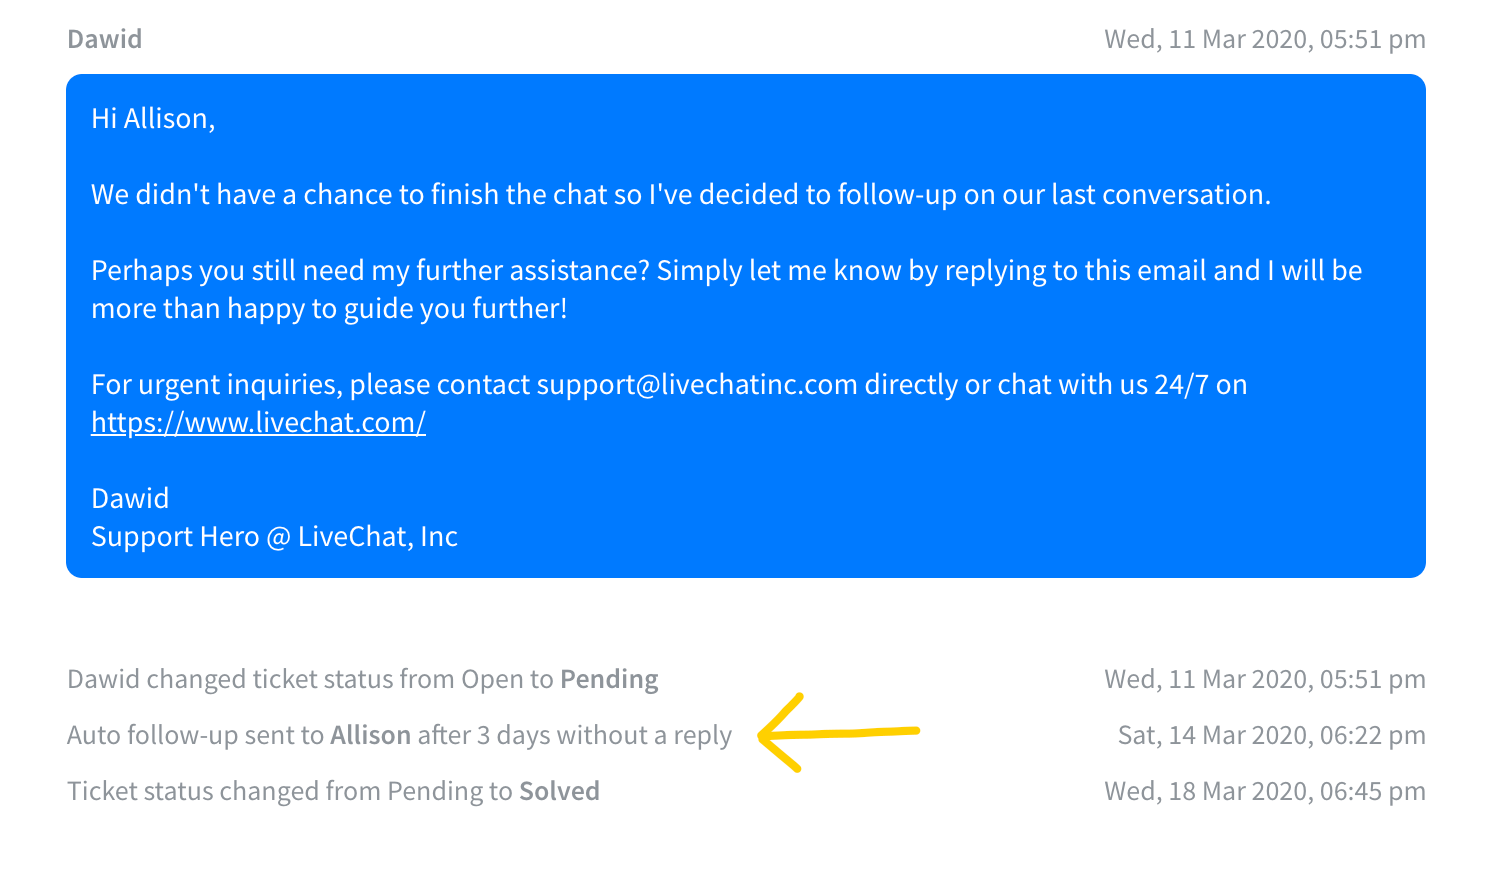
If the customer does not respond to the automatic follow-up email in four days, the status of such a ticket is automatically changed to Solved.
The automatic follow-up email is not sent when the ticket status is changed to Pending manually. The follow-up email cannot be disabled, however, if you don’t wish for the automatic follow-up to be sent, you can manually switch the ticket status to Solved when sending the response, and the automatic follow-up will not be triggered.
Tickets reports
If your customers can contact you through many channels, it’s easy to get snowed under with tickets and run late with replies. That’s where ticket reports come in handy. Use them to check if your team is on top of their tickets goals.
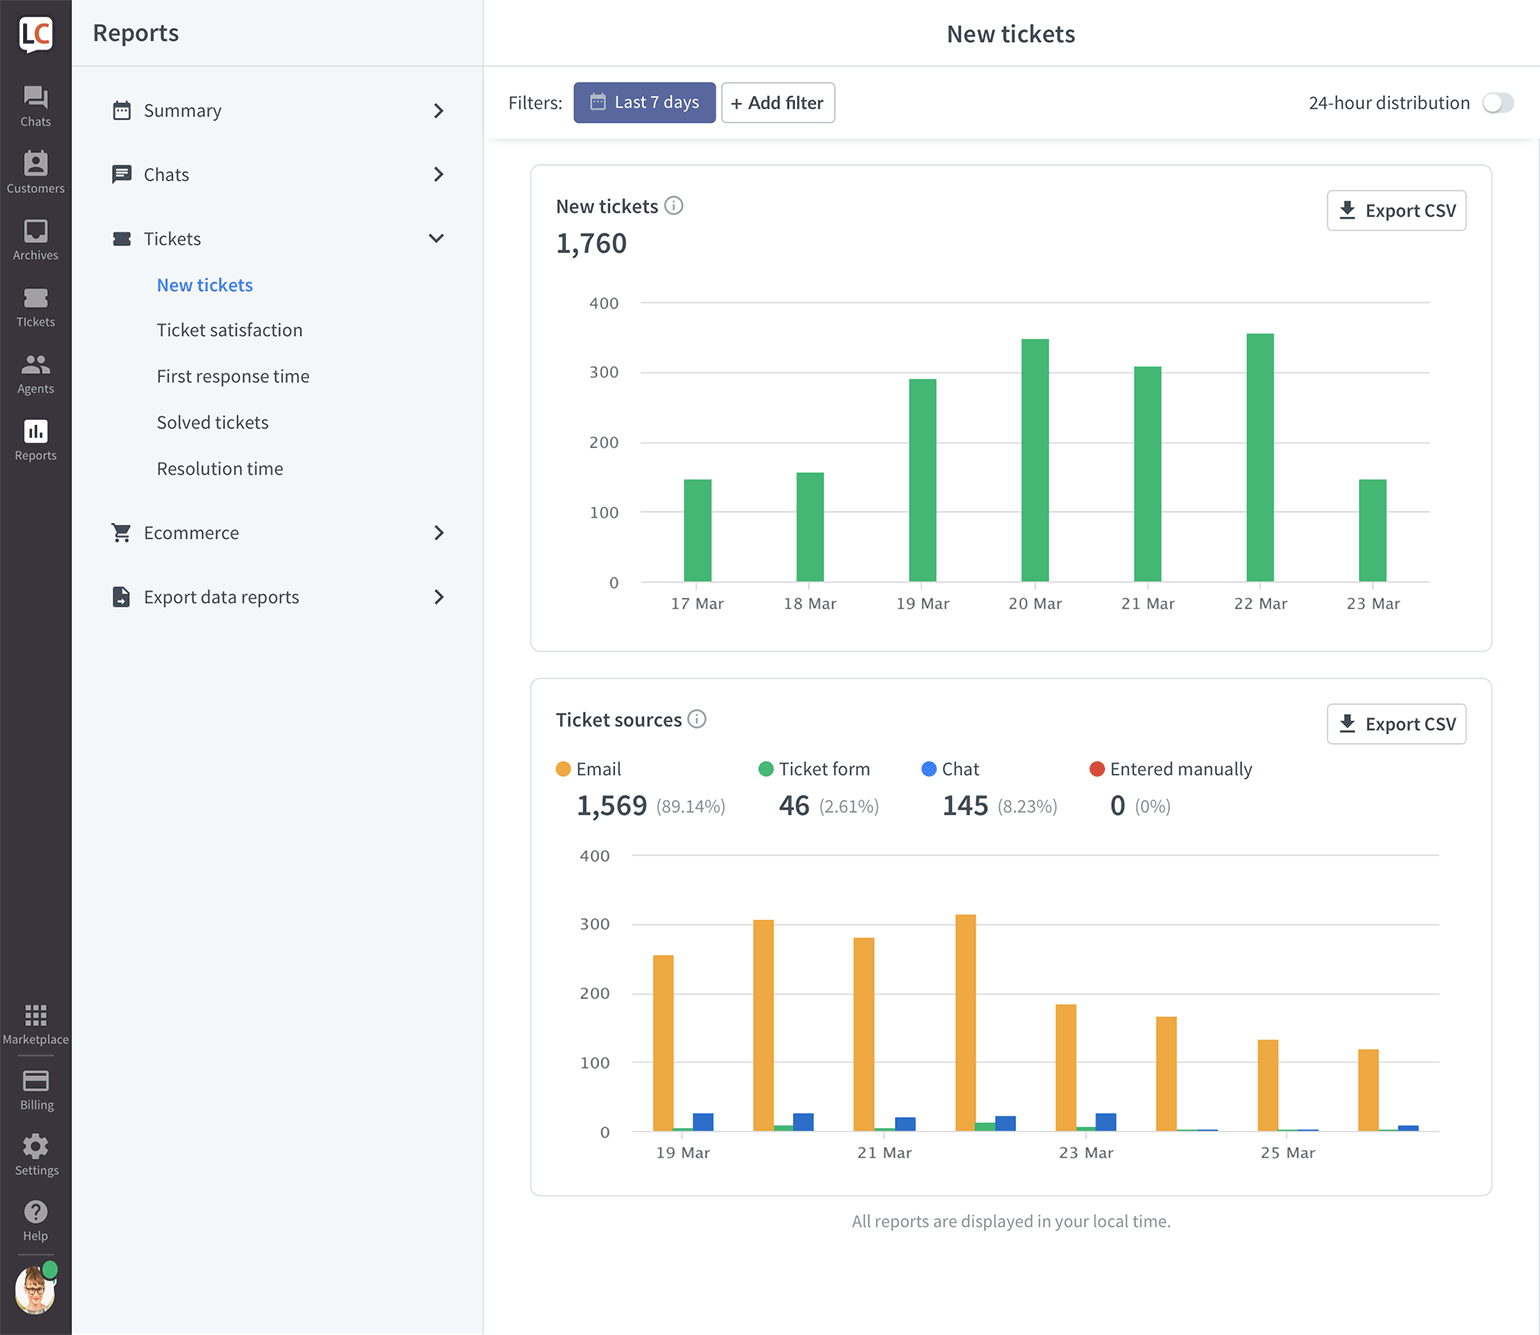
New tickets report
The new tickets report shows the total number of tickets you got during a given period. It’s useful to keep an eye on this report to see how your agents’ workload changes.
The more customers you have, the more tickets you get, which in time could mean that you should increase the number of agents. Or you could create self-help articles with KnowledgeBase so customers can solve easier cases by themselves.
A sudden increase in the number of tickets could mean that there is something your customers aren’t happy about. In that situation, click on one of the columns in the chart to see the tickets from that particular time. You can review them manually to see what happened in detail.
Ticket sources
The ’ticket sources’ chart shows how many of your tickets:
- come from email
- come from the ticket form
- are created in a chat
- are entered manually
Each source is represented by a bar in a different color. You can click on any bar to view the tickets coming from that particular source.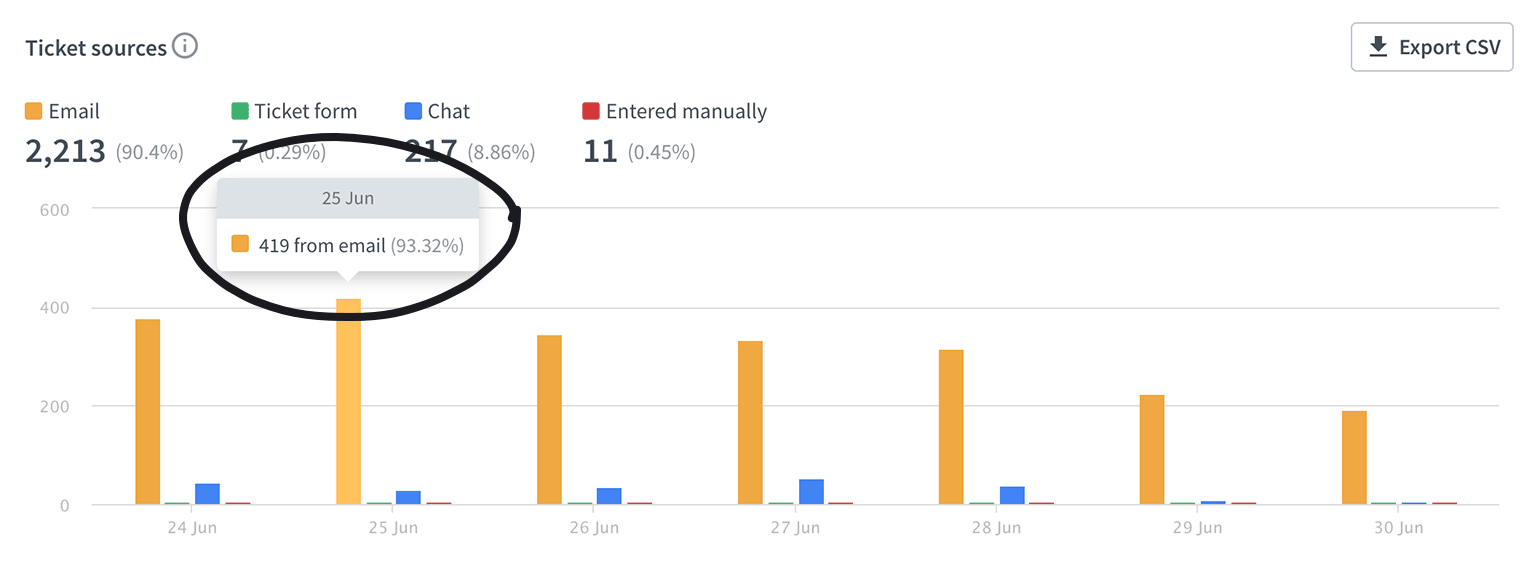
If a lot come from the ticket form, it might mean that you’re making your customers wait a long time for a reply. In that case, you should consider extending your online hours.
Learn more about the ticket form.
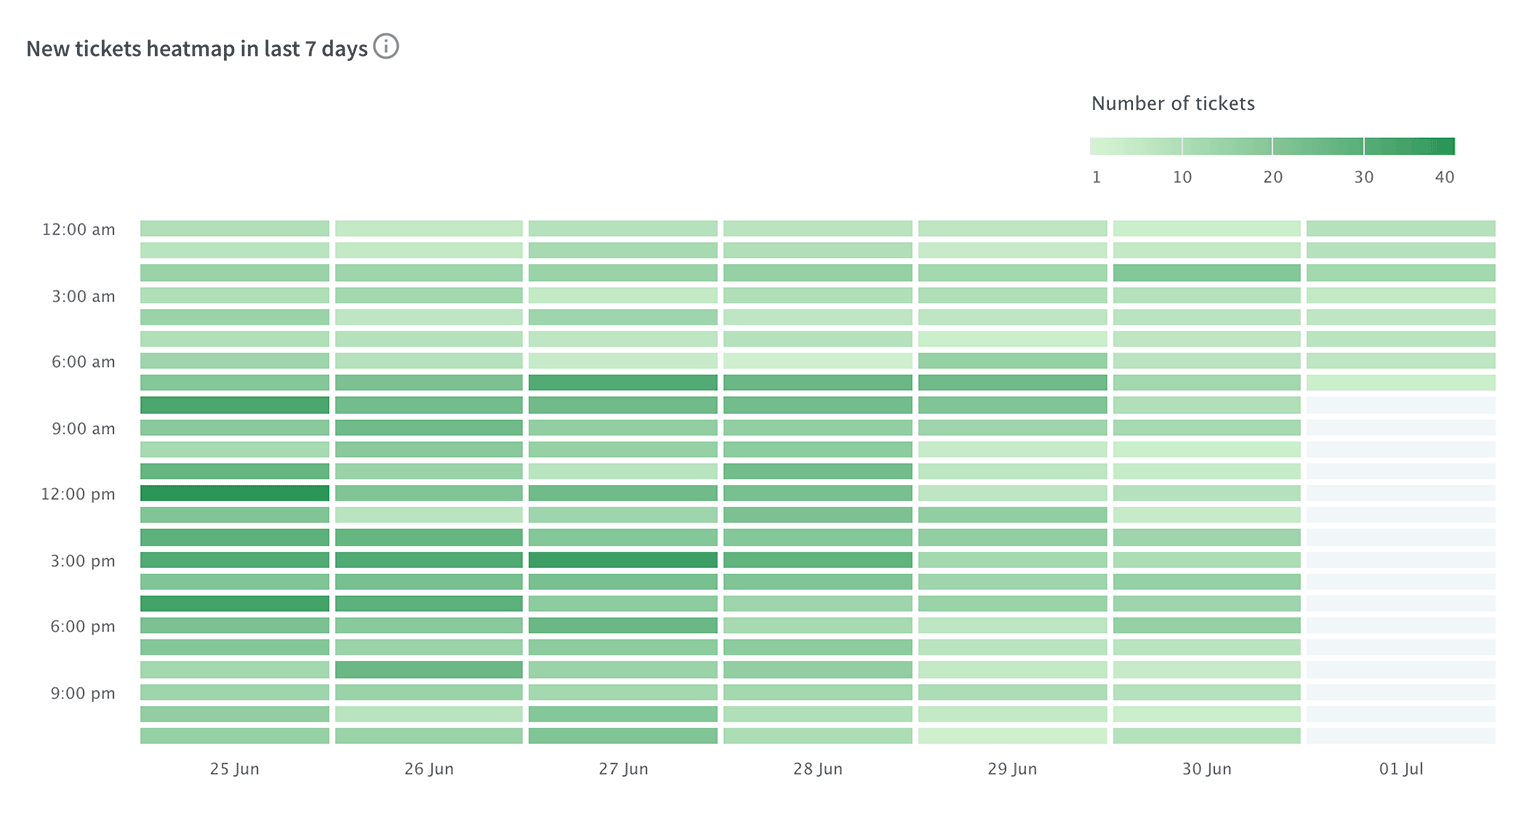
New tickets heatmap
The heatmap is a great extension to the ’new tickets’ and ’ticket sources’ reports. As it shows the time of day when you get the most tickets. It makes planning shifts and distributing tasks easier, as you know the amount of work you should expect.
Ticket satisfaction report
The report shows the number of both good and bad ratings on particular dates as well as the overall satisfaction of your customers.
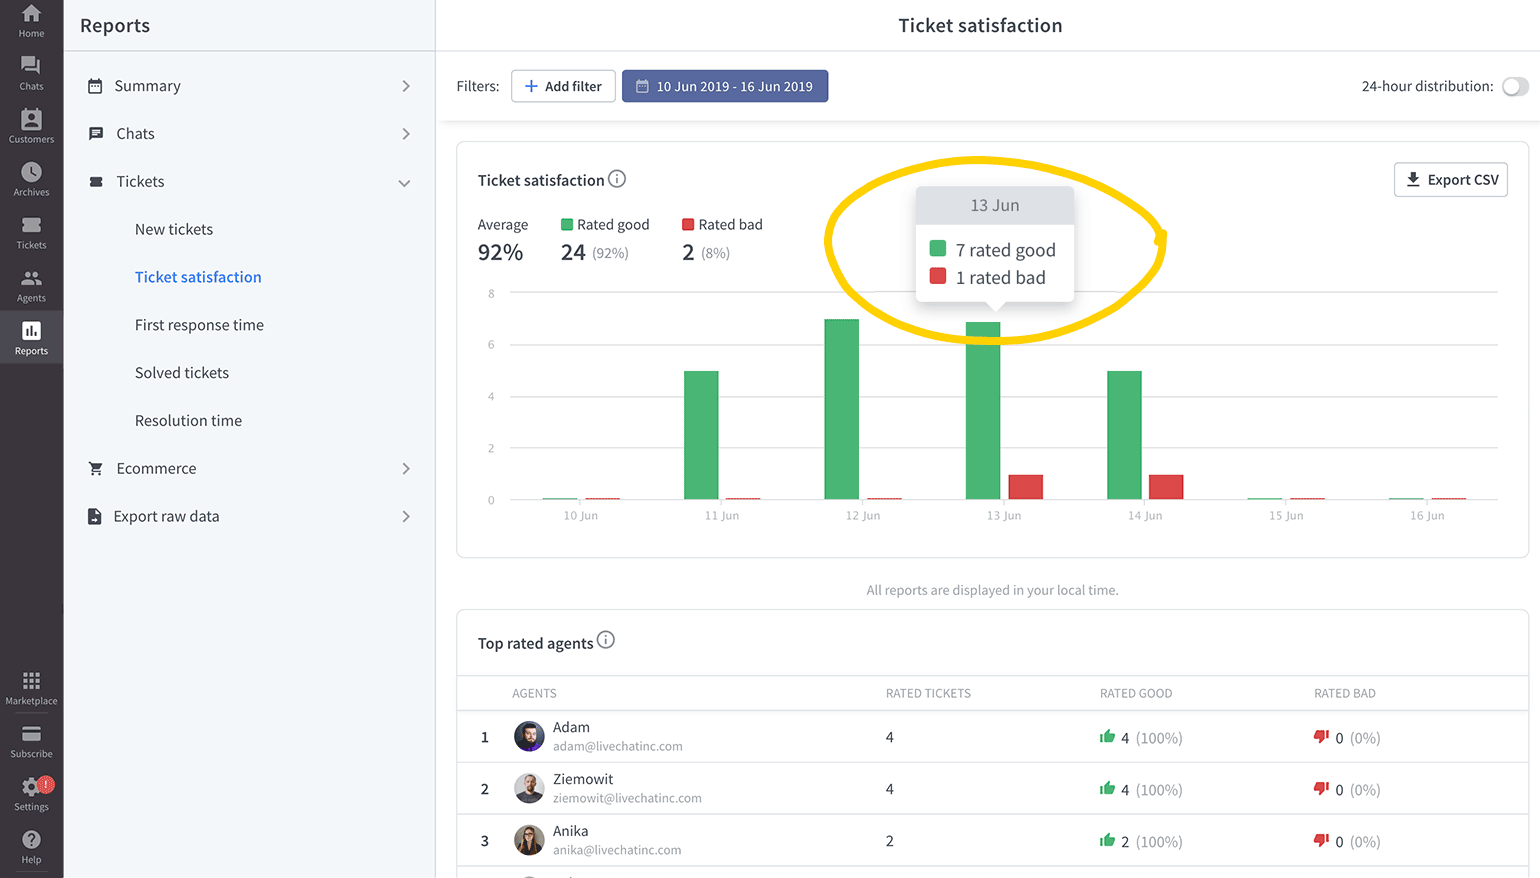
To evaluate particular tickets that were rated as bad, click on the red bar representing a specific date. You will be taken to Tickets where you can check the cases one by one. You can view tickets with a positive rating in the same way.
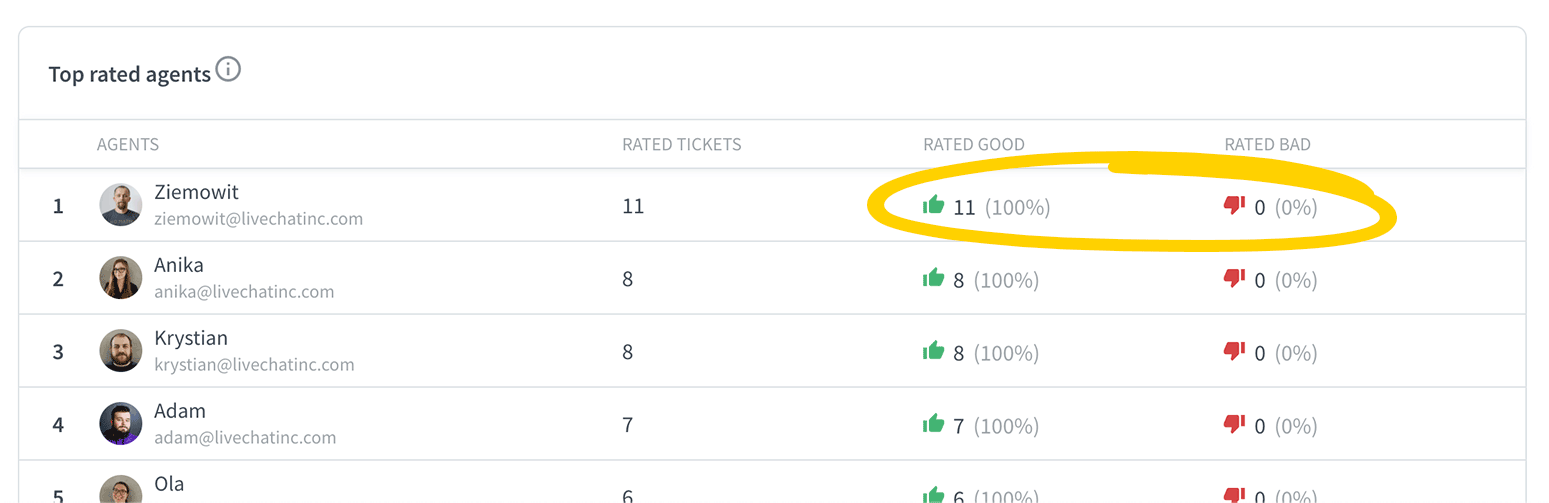
The report also shows a list of your top agents. You can see the number of good and bad ratings for each agent.
How ticket ratings work
Ticket requesters get a chance to rate their experience 24 hours after the ticket has been marked as solved. Just like chats, tickets can be rated either as good or bad. The 24-hour delay is added in case the customer needs to reopen the ticket.
Ticket rating request is enabled by default. To disable it, go to the Ticket settings and uncheck the box.
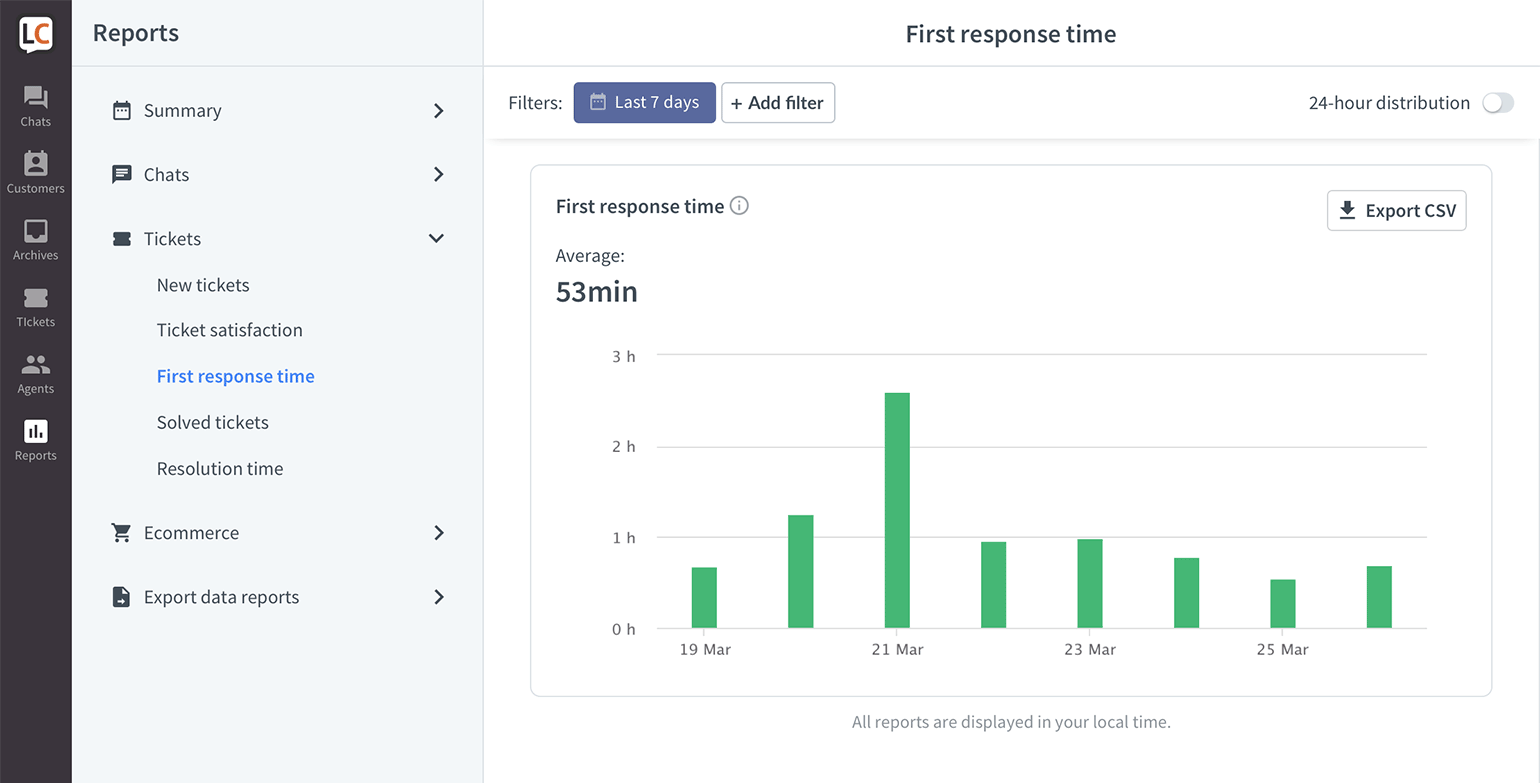
First response time report
This report shows you how quick your agents are to respond to new tickets. To provide you some background, the information about the total number of tickets answered that day is also available. The response time clock starts as soon as the ticket is created and stops when a reply to the ticket is posted.
Resolution time report
The data from this report tells you how long, on average, it takes for your agents to resolve a ticket. Just like in the case of the ’ticket first response’ report, you can check the ticket resolution times for various groups and individual agents.
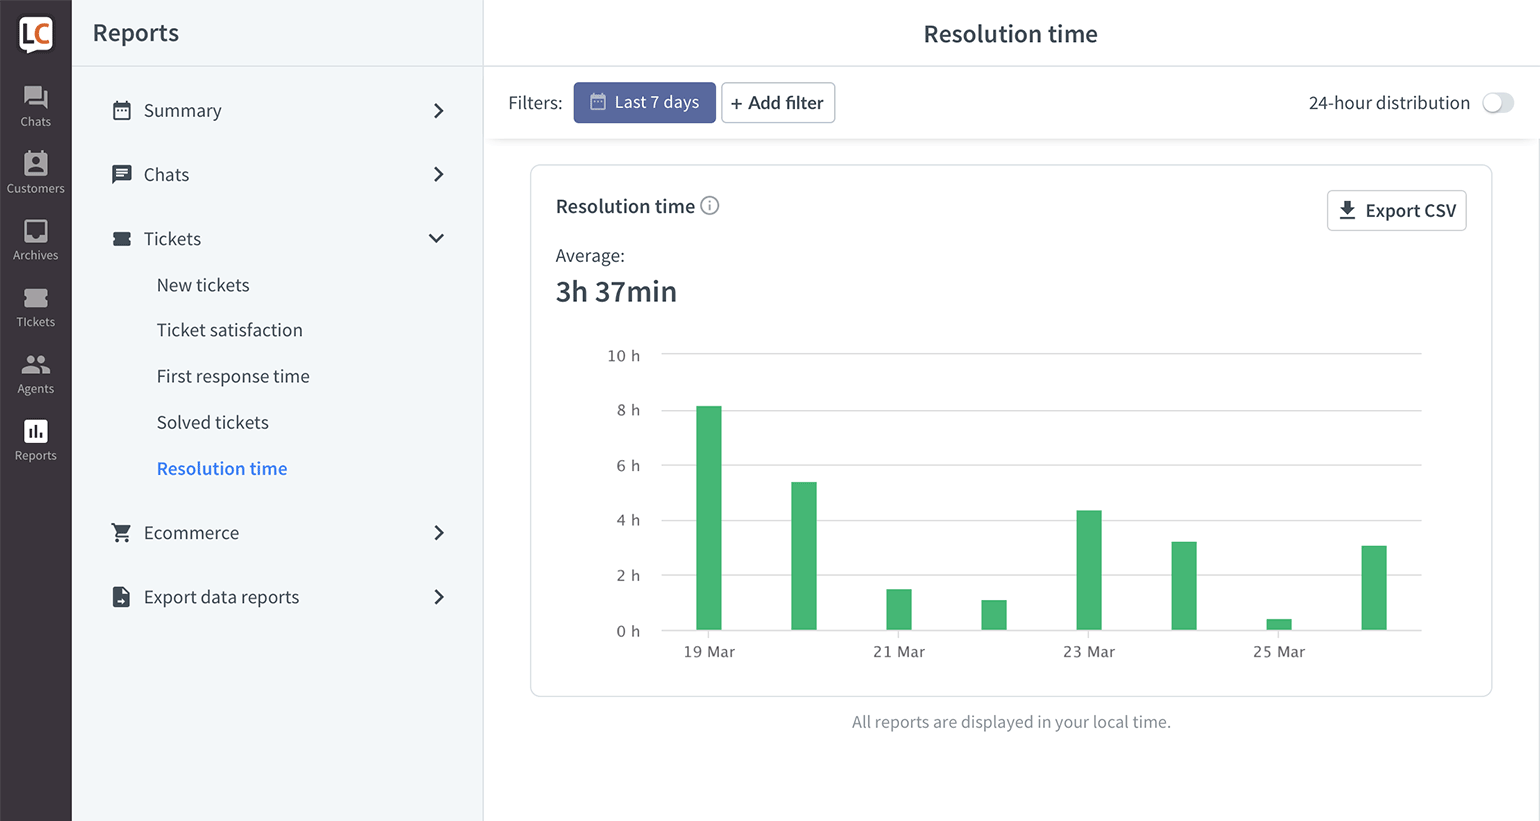
The resolution time is counted from the moment the ticket is created to the moment the ticket is marked as resolved.
Solved tickets report
Whether your team works according to KPI, SLA, or other pre-defined metrics, it makes sense to keep track of the number of tickets solved each day. It’s important to resolve cases via tickets as soon as possible, as customers can quickly start feeling like you’re ignoring them.
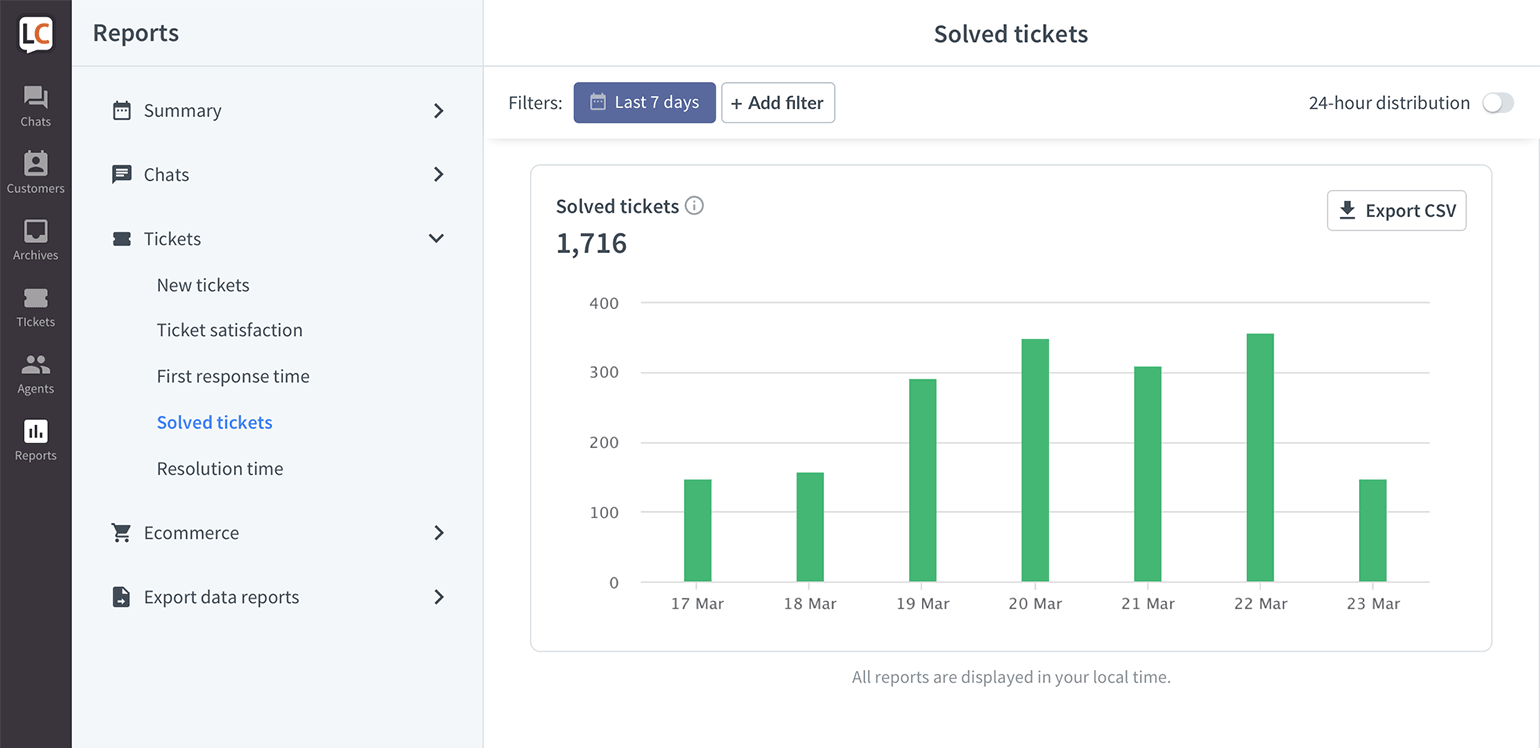
You can hover over a column to see a precise number of tickets solved that day. When you click on it, you will be taken to the Tickets section and be able to see and review all of them.
Best practices
You should reply to all tickets as soon as possible. This will reassure your customer that you are aware of the problem and you are looking into it. Try keeping your first reply time under 30 minutes.
When it comes to ticket resolution, you should aim to get a ticket resolved within 8 hours after its creation. Keep in mind that most tickets can be resolved within an hour and only the most complicated cases will require more time.
For more useful tips on how to handle tickets, read posts on our blog:
4 Ways to Handle a Support Ticket Faster
7 Ways to Properly Handle a Support Ticket
Additionally, try increasing your online time. This way, you won’t get as many offline messages and have the most opportunities to chat with clients and solve their problems immediately.